2D移動の概要
はじめに
初心者はみんな、こう考えます: 「どうやってキャラクターを動かすの?」作成しているゲームのスタイルによっては、特別な要件がある場合がありますが、一般的に、ほとんどの2Dゲームの動きは少数のデザインに基づいています。
この例では KinematicBody2D を使用しますが、同じことが他のノードタイプ(Area2D、RigidBody2D)にも適用されます。
セットアップ
以下の各例では、同じシーン設定を使用しています。Sprite と CollisionShape2D の2つの子を持つ KinematicBody2D から始めます。スプライトのテクスチャにGodotアイコン( "icon.png")を使用するか、他の2Dイメージを使用できます。
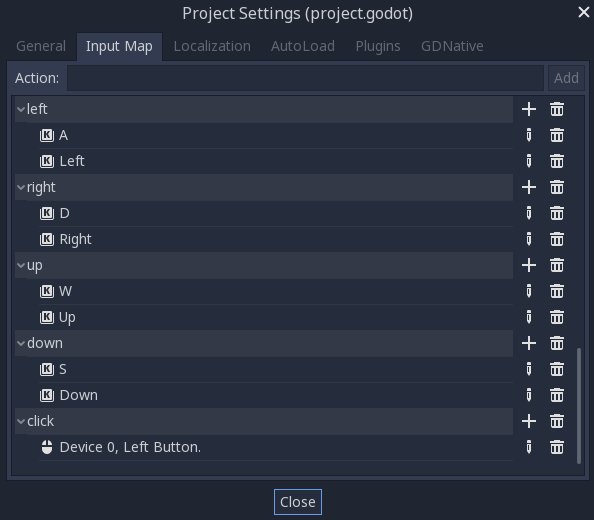
プロジェクト → プロジェクト設定 を開き、[入力マップ]タブを選択します。次の入力アクションを追加します(詳細については、InputEvent を参照してください):
8方向移動
このシナリオでは、ユーザが8方向キー(上/左/下/右またはW/A/S/D)を押して、選択した方向に移動するようにします。「8方向移動」という名称は、2つのキーを同時に押すことでプレイヤーが斜めに移動できることに由来しています。
キネマティックボディにスクリプトを追加して、次のコードを追加します:
extends KinematicBody2D

export (int) var speed = 200

var velocity = Vector2()

func get_input():
    velocity = Vector2()
    if Input.is_action_pressed("right"):
        velocity.x += 1
    if Input.is_action_pressed("left"):
        velocity.x -= 1
    if Input.is_action_pressed("down"):
        velocity.y += 1
    if Input.is_action_pressed("up"):
        velocity.y -= 1
    velocity = velocity.normalized() * speed

func _physics_process(delta):
    get_input()
    velocity = move_and_slide(velocity)
using Godot;
using System;

public class Movement : KinematicBody2D
{
    [Export] public int speed = 200;

    public Vector2 velocity = new Vector2();

    public void GetInput()
    {
        velocity = new Vector2();

        if (Input.IsActionPressed("right"))
            velocity.x += 1;

        if (Input.IsActionPressed("left"))
            velocity.x -= 1;

        if (Input.IsActionPressed("down"))
            velocity.y += 1;

        if (Input.IsActionPressed("up"))
            velocity.y -= 1;

        velocity = velocity.Normalized() * speed;
    }

    public override void _PhysicsProcess(float delta)
    {
        GetInput();
        velocity = MoveAndSlide(velocity);
    }
}
In the get_input() function, we check for the four key events and sum them
up to get the velocity vector. This has the benefit of making two opposite keys
cancel each other out, but will also result in diagonal movement being faster
due to the two directions being added together.
速度を*正規化*した場合、つまり速度の*長さ*を 1 に設定し、希望の速度で乗算した場合、これを防ぐことができます。
ちなみに
以前にベクトル演算を使用したことがない場合、あるいは忘れてしまった場合は、ベクトル演算 でGodotのベクトル使用の説明をみることができます。
注釈
If the code above does nothing when you press the keys, double-check that you've set up input actions correctly as described in the セットアップ part of this tutorial.
回転+移動
このタイプの動きは、昔ながらのアーケードゲームの仕組みに似ているため、 "Asteroids-style" と呼ばれることもあります。左/右を押すとキャラクタが回転し、上/下を押すとキャラクタの向きに関係なく前後に移動します。

extends KinematicBody2D

export (int) var speed = 200
export (float) var rotation_speed = 1.5

var velocity = Vector2()
var rotation_dir = 0

func get_input():
    rotation_dir = 0
    velocity = Vector2()
    if Input.is_action_pressed("right"):
        rotation_dir += 1
    if Input.is_action_pressed("left"):
        rotation_dir -= 1
    if Input.is_action_pressed("down"):
        velocity = Vector2(-speed, 0).rotated(rotation)
    if Input.is_action_pressed("up"):
        velocity = Vector2(speed, 0).rotated(rotation)

func _physics_process(delta):
    get_input()
    rotation += rotation_dir * rotation_speed * delta
    velocity = move_and_slide(velocity)
using Godot;
using System;

public class Movement : KinematicBody2D
{
    [Export] public int speed = 200;
    [Export] public float rotationSpeed = 1.5f;

    public Vector2 velocity = new Vector2();
    public int rotationDir = 0;

    public void GetInput()
    {
        rotationDir = 0;
        velocity = new Vector2();

        if (Input.IsActionPressed("right"))
            rotationDir += 1;

        if (Input.IsActionPressed("left"))
            rotationDir -= 1;

        if (Input.IsActionPressed("down"))
            velocity = new Vector2(-speed, 0).Rotated(Rotation);

        if (Input.IsActionPressed("up"))
            velocity = new Vector2(speed, 0).Rotated(Rotation);

        velocity = velocity.Normalized() * speed;
    }

    public override void _PhysicsProcess(float delta)
    {
        GetInput();
        Rotation += rotationDir * rotationSpeed * delta;
        velocity = MoveAndSlide(velocity);
    }
}
ここでは、回転方向と速度を追跡するために2つの新しい変数を追加しました。 この場合も、両方のキーを同時に押すとキャンセルされ、回転しなくなります。回転は、ボディの rotation プロパティに直接適用されます。
速度を設定するには、ボディと同じ方向を指すように Vector2.rotated()``メソッドを使用します。\ ``rotated() は、三角関数を適用する必要がある多くの状況で使用できる便利なベクトル関数です。
回転+移動(マウス)
この動作スタイルは、前の動作スタイルのバリエーションです。 今回は、キーボードの代わりにマウスの位置によって方向が設定されます。 キャラクタは常にマウスポインタを "見ます" 。ただし、フォワード/バック入力は同じままです。
extends KinematicBody2D

export (int) var speed = 200

var velocity = Vector2()

func get_input():
    look_at(get_global_mouse_position())
    velocity = Vector2()
    if Input.is_action_pressed("down"):
        velocity = Vector2(-speed, 0).rotated(rotation)
    if Input.is_action_pressed("up"):
        velocity = Vector2(speed, 0).rotated(rotation)

func _physics_process(delta):
    get_input()
    velocity = move_and_slide(velocity)
using Godot;
using System;

public class Movement : KinematicBody2D
{
    [Export] public int speed = 200;

    public Vector2 velocity = new Vector2();

    public void GetInput()
    {
        LookAt(GetGlobalMousePosition());
        velocity = new Vector2();

        if (Input.IsActionPressed("down"))
            velocity = new Vector2(-speed, 0).Rotated(Rotation);

        if (Input.IsActionPressed("up"))
            velocity = new Vector2(speed, 0).Rotated(Rotation);

        velocity = velocity.Normalized() * speed;
    }

    public override void _PhysicsProcess(float delta)
    {
        GetInput();
        velocity = MoveAndSlide(velocity);
    }
}
ここでは、 Node2D look_at() メソッドを使用して、プレイヤーを特定の位置に向けます。この関数を使用しない場合は、次のように角度を設定しても同じ効果が得られます:
rotation = get_global_mouse_position().angle_to_point(position)
var rotation = GetGlobalMousePosition().AngleToPoint(Position);
クリックと移動
この最後の例では、マウスのみを使用してキャラクタを制御します。画面上でクリックすると、プレイヤーが目的の場所に移動します。

extends KinematicBody2D

export (int) var speed = 200

onready var target = position
var velocity = Vector2()

func _input(event):
    if event.is_action_pressed("click"):
        target = get_global_mouse_position()

func _physics_process(delta):
    velocity = position.direction_to(target) * speed
    # look_at(target)
    if position.distance_to(target) > 5:
        velocity = move_and_slide(velocity)
using Godot;
using System;

public class Movement : KinematicBody2D
{
    [Export] public int speed = 200;

    public Vector2 target;
    public Vector2 velocity = new Vector2();

    public override void _Ready()
    {
        target = Position;
    }

    public override void _Input(InputEvent @event)
    {
        if (@event.IsActionPressed("click"))
        {
            target = GetGlobalMousePosition();
        }
    }

    public override void _PhysicsProcess(float delta)
    {
        velocity = Position.DirectionTo(target) * speed;
        // LookAt(target);
        if (Position.DistanceTo(target) > 5)
        {
            velocity = MoveAndSlide(velocity);
        }
    }
}
移動前に行う distance_to() チェックに注意してください。このテストを行わないと、身体は目標位置に到達すると、位置をわずかに越えて前後に移動しようとするので、動き過ぎを繰り返す「ジッタ」を起こします。
好みに応じて look_at() 行のコメントを外すと、ボディが動きの方向を指すように回転します。
ちなみに
このテクニックは、 "following" キャラクタの基礎としても使用できます。target 位置には、移動先の任意のオブジェクトの位置を指定できます。
概要
これらのコードサンプルは、独自のプロジェクトの開始点として便利です。ご自由に使って、どんなものが作れるか試してみてください。
このサンプルプロジェクトはこちらからダウンロードできます: 2D_movement_demo.zip