インポートプロセス
Godot 3.0+ でのアセットのインポート
以前、Godot 2.xでアセットをインポートするには、ソースアセットがある個別のディレクトリを手動でメンテナンスする必要がありました。これを行わないと、テクスチャ、オーディオファイル、シーンなどのインポートフラグを変換、および変更する方法を指定できませんでした。
In Godot 3.0+, we use a more modern approach to importing: Simply drop
your assets (image files, scenes, audio files, fonts, etc) directly in the
project folder (copy them manually with your OS file explorer).
Godot will automatically import these files internally
and keep the imported resources hidden in a res://.import folder.
This means that when trying to access imported assets through code you need to use the Resource Loader as it will automatically take into account where the internal files are saved. If you try and access an imported asset using the File class it will work in the editor, but break in the exported project.
However, the Resource Loader cannot access non imported files, only the File class can.
インポートパラメーターの変更
To change the import parameters of an asset in Godot (again, keep in mind import parameters are only present in non-native Godot resource types) select the relevant resource in the filesystem dock:
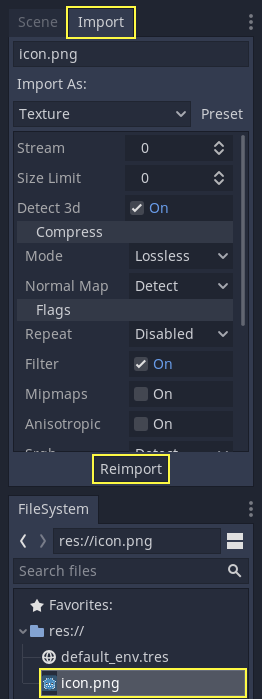
次に、パラメーターを調整した後、「再インポート(Reimport)」を押します。これらのパラメーターは、このアセットと今後の再インポートでのみ使用されます。
複数のアセットのインポートパラメーターを同時に変更することもできます。リソースドックでそれらをすべて一緒に選択するだけで、再インポート時に公開されたパラメータがそれらすべてに適用されます。
Reimporting multiple assets
While working on a project you may find that several assets need to have the same parameters changed, such as enabling mipmaps, but you only want those specific parameters changed. To do this, select every asset you want to reimport in the file system. In the import tab there will now be a checkbox to the left of every import parameter.
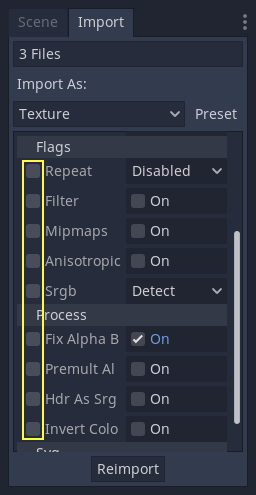
Select the checkbox of the parameters you want to change on your imported assets, then change the parameters normally. Finally, click the reimport button and every selected asset will be reimported with only those parameters changed.
自動再インポート
ソースアセットのMD5チェックサムが変更されると、Godot はそのアセットの自動再インポートを実行し、その特定のアセットに設定されたプリセットを適用します。
生成されたファイル
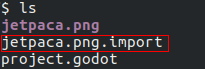
Importing will add an extra <asset>.import file, containing the import
configuration. Make sure to commit these to your version control system!
Additionally, extra assets will be preset in the hidden res://.import folder:

このフォルダに存在するファイルのいずれか(またはフォルダ全体)が消去されると、アセットは自動的に再インポートされます。そのため、このフォルダをバージョン管理システムにコミットすることはオプションです。別のコンピューターでチェックアウトするときの再インポート時間を短縮できますが、かなり多くの領域と転送時間がかかります。あなたの好きな方法を選んで下さい(Pick your poison)!
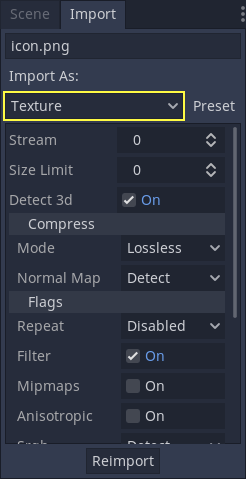
インポートリソースの種類の変更
一部のソースアセットは、さまざまなタイプのリソースとしてインポートできます。このために、必要なリソースの種別を選択し、「再インポート」を押します:
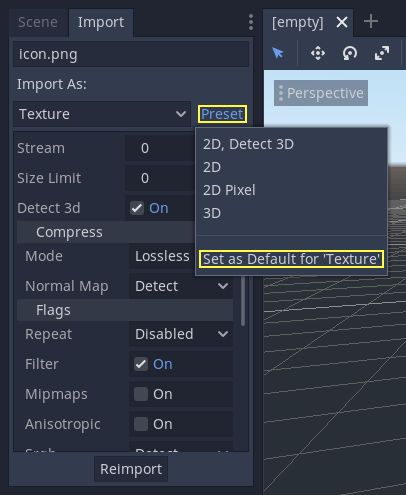
デフォルトのインポートパラメーターの変更
ゲームの種類によって、必要なデフォルトが異なる場合があります。プロジェクトごとにデフォルトを変更するには、「プリセット..」メニューを使用します。プリセットを提供する一部のリソースタイプのほかに、デフォルト設定を保存したり消去したりすることもできます:
シンプルさが鍵です!
これは非常に単純なワークフローであり、慣れるまでにはほとんど時間がかかりません。また、より正確なリソースの処理方法も強制します。
インポート可能なアセットの種類はたくさんありますので、そのすべてを操作する方法を理解するために読んでください!