GDNative C++の例
はじめに
このチュートリアルは、GDNative Cの例で示されている情報の上に基づいているので、最初にそれを読むことを強くお勧めします。
GDNativeのC++バインディングはNativeScript GDNative APIの上に構築されており、C++を使用してGodotでノードを「拡張」するためのより良い方法を提供します。これは、GDScriptでスクリプトを記述するのと同じですが、代わりにC++で記述します。
このチュートリアルで作成する完全な例を GitHub からダウンロードできます。
プロジェクトの設定
必要な前提条件がいくつかあります:
Godot 3.x実行可能ファイル、
C++コンパイラ、
ビルドツールとしてのSCons、
a copy of the godot-cpp repository.
コンパイルも参照してください。ビルドツールは、ソースからGodotをコンパイルするために必要なツールと同じです。
これらのリポジトリをGitHubからダウンロードすることも、Gitに作業を任せることができます。これらのリポジトリには、Godotのバージョンごとに異なるブランチがあることに注意してください。 Godotの以前のバージョン用に書かれたGDNativeモジュールは、(3.0と3.1の間のARVRインターフェースの1つの重大な変更を除いて)新しいバージョンでも機能します。また、 api.json の生成に使用するGodotのバージョンが最小のバージョンになることに注意してください。
注釈
GDExtension
has been merged in the master branch of godot-cpp,
but it is only compatible with the upcoming Godot 4.0.
Therefore, you need to use the 3.x branch of godot-cpp to use GDNative
and follow this example.
This tutorial covers only GDNative in Godot 3.x, not GDExtension in Godot 4.0.
Git を使用してプロジェクトをバージョン管理する場合は、Git サブモジュールとして追加することをお勧めします:
mkdir gdnative_cpp_example
cd gdnative_cpp_example
git init
git submodule add -b 3.x https://github.com/godotengine/godot-cpp
cd godot-cpp
git submodule update --init
リポジトリを単にダウンロードするか、プロジェクトフォルダに複製する場合は、フォルダのレイアウトをここで説明したものと同じにしてください。ここで紹介するコードの多くは、プロジェクトがこのレイアウトに従うことを前提としています。
両方のリポジトリをプルするために、必ず再帰的にクローンを作成してください:
mkdir gdnative_cpp_example
cd gdnative_cpp_example
git clone --recursive -b 3.x https://github.com/godotengine/godot-cpp
注釈
godot-cpp now includes godot-headers as a nested submodule, if you've
manually downloaded them please make sure to place godot-headers inside
of the godot-cpp folder.
You don't have to do it this way, but we've found it easiest to manage. If you decide to download the repositories or clone them into your folder, make sure to keep the folder layout the same as we've setup here. Much of the code we'll be showcasing here assumes the project has this layout.
概要で指定したリンクからサンプルを複製した場合、サブモジュールは自動的に初期化されません。次のコマンドを実行する必要があります。
cd gdnative_cpp_example
git submodule update --init --recursive
これにより、これら2つのリポジトリがプロジェクトフォルダに複製されます。
C++バインディングのビルド
前提条件に書かれた物をダウンロードしたので、C++バインディングを作成します。
リポジトリには、現在のGodotリリースのメタデータのコピーが含まれていますが、新しいバージョンのGodot用にこれらのバインディングをビルドする必要がある場合は、下記のオプションでGodot実行可能ファイルを呼び出します:
godot --gdnative-generate-json-api api.json
結果として得られた api.json ファイルをプロジェクトフォルダに配置し、use_custom_api_file=yes custom_api_file=../api.json を、以下のバインディング生成用のsconsコマンドに追加します。
バインディングを生成してコンパイルするには、次のコマンドを使用します(OSに応じて <platform> を windows、linux または osx に置き換えます):
コンパイルを高速化するには、SConsコマンドラインの最後に -jN を追加します。N はシステムにあるCPUスレッドの数です。以下の例では4つのスレッドを使用しています。
cd godot-cpp
scons platform=<platform> generate_bindings=yes -j4
cd ..
この手順にはしばらく時間がかかります。完了後、プロジェクト内の godot-cpp/bin/ に、コンパイルされた静的ライブラリが格納されているはずです。
注釈
You may need to add bits=64 to the command on Windows or Linux.
シンプルなプラグインの作成
次に、実際のプラグインを作成します。まず、空のGodotプロジェクトを作成し、そこにいくつかのファイルを配置します。
Godotを開き、新しいプロジェクトを作成します。この例では、GDNativeモジュールのフォルダ構造内に demo という名前のフォルダを配置します。
デモプロジェクトでは、"Main" というノードを含むシーンを作成し、main.tscn として保存します。それについては後で説明します。
最上位の GDNativeモジュールフォルダに戻り、ソース ファイルを配置する src というサブフォルダも作成します。
You should now have demo, godot-cpp, godot-headers, and src
directories in your GDNative module.
作成するGDNativeノードのヘッダーファイルを、srcフォルダ内に作成することから始めます。gdexample.h という名前を付けます:
#ifndef GDEXAMPLE_H
#define GDEXAMPLE_H

#include <Godot.hpp>
#include <Sprite.hpp>

namespace godot {

class GDExample : public Sprite {
    GODOT_CLASS(GDExample, Sprite)

private:
    float time_passed;

public:
    static void _register_methods();

    GDExample();
    ~GDExample();

    void _init(); // our initializer called by Godot

    void _process(float delta);
};

}

#endif
上記にはいくつかの注意事項があります。まず、すべての基本的な定義を含む Godot.hpp を含めています。その後、Spriteクラスへのバインディングを含む Sprite.hpp を含めます。このクラスが作成するモジュールで拡張されます。
GDNativeのすべてがこの名前空間内で定義されているため、namespace godot を使用しています。
次に、コンテナ クラスを通じてSpriteから継承するクラス定義を作成します。これについては、後でいくつかの副作用が表示されます。GODOT_CLASS マクロはいくつかの内部的なものをセットアップします。
その後、time_passed という単一のメンバー変数を宣言します。
メソッドを定義する次のブロックでは、明示的にコンストラクターとデストラクターが定義されています。その他の関数のうち2つのは見慣れたものですが、新しいメソッドが1つあります。
最初は _register_methods で、これはGodotがNativeScriptで呼び出すことができるメソッドと、それが公開するプロパティを調べるために呼び出す静的関数です。2つ目は _process 関数で、GDScriptで慣れている _process 関数とまったく同じように機能します。3つ目は、Godotがオブジェクトを適切に設定した後に呼び出される _init 関数です。コードを配置しなくても存在する必要があります。
gdexample.cpp ファイルを作成して関数を実装してみましょう:
#include "gdexample.h"

using namespace godot;

void GDExample::_register_methods() {
    register_method("_process", &GDExample::_process);
}

GDExample::GDExample() {
}

GDExample::~GDExample() {
    // add your cleanup here
}

void GDExample::_init() {
    // initialize any variables here
    time_passed = 0.0;
}

void GDExample::_process(float delta) {
    time_passed += delta;

    Vector2 new_position = Vector2(10.0 + (10.0 * sin(time_passed * 2.0)), 10.0 + (10.0 * cos(time_passed * 1.5)));

    set_position(new_position);
}
これは簡単なはずです。ヘッダーファイルで定義したクラスの各メソッドを実装しています。register_method の呼び出しでは必ず _ process メソッドを公開する必要があることに注意してください。さもないと、Godotはそれを使用できなくなります。ただし、コンストラクター、デストラクター、および_init 関数についてGodotに伝える必要はありません。
The other method of note is our _process function, which simply keeps track
of how much time has passed and calculates a new position for our sprite using a
sine and cosine function. What stands out is calling
owner->set_position to call one of the built-in methods of our Sprite. This
is because our class is a container class; owner points to the actual Sprite
node our script relates to.
必要なC++ファイルがもう1つあるので、それには gdlibrary.cpp という名前を付けます。 GDNativeプラグインには複数のNativeScriptを含めることができ、上記の GDExample を実装したように、それぞれに独自のヘッダーとソースファイルがあります。今必要なのは、GDNativeプラグイン内のすべてのNativeScriptについてGodotに伝える小さなコードです。
#include "gdexample.h"

extern "C" void GDN_EXPORT godot_gdnative_init(godot_gdnative_init_options *o) {
    godot::Godot::gdnative_init(o);
}

extern "C" void GDN_EXPORT godot_gdnative_terminate(godot_gdnative_terminate_options *o) {
    godot::Godot::gdnative_terminate(o);
}

extern "C" void GDN_EXPORT godot_nativescript_init(void *handle) {
    godot::Godot::nativescript_init(handle);

    godot::register_class<godot::GDExample>();
}
ここで実装されている3つの関数は名前空間なしで定義する必要があるため、ここでは godot という名前空間を使用していないことに注意してください。
godot_gdnative_init および godot_gdnative_terminate 関数は、Godotがプラグインをロードするときとアンロードするときにそれぞれ呼び出されます。ここで行っているのは、バインディングモジュールの関数を解析してそれらを初期化することだけですが、必要に応じてより多くのことを設定する必要がある場合があります。
重要な関数は godot_nativescript_init と呼ばれる3番目の関数です。まず、通常の処理を行うバインディングライブラリの関数を呼び出します。その後、ライブラリの各クラスに対して関数 register_class を呼び出します。
プラグインのコンパイル
SConsがビルドに使用する SConstruct ファイルを手で簡単に書くことはできません。この例では、準備されている his hardcoded SConstruct file を使用します。以降のチュートリアルでは、これらのビルドファイルの使用方法について、よりカスタマイズ可能で詳細な例を取り上げます。
注釈
この SConstruct ファイルは、最新の godot-cpp マスターで使用するために作成されました。古いバージョンで使用するときは必要に応じて小さな変更を加えるか、Godot 3.0 のドキュメント内の SConstruct ファイルを参照する必要があります。
Once you've downloaded the SConstruct file, place it in your GDNative module
folder besides godot-cpp, godot-headers and demo, then run:
scons platform=<platform>
これで ``demo/bin/<platform> `` 内でモジュールを見つけることができるはずです。
注釈
ここでは、godot-cpp と gdexample ライブラリの両方を、デバッグビルドとしてコンパイルしました。最適化されたビルドの場合は、target=release スイッチを使用してコンパイルする必要があります。
GDNativeモジュールの使用
Godotに戻る前に、demo/bin/ にさらに2つのファイルを作成する必要があります。どちらもGodotエディタを使用して作成できますが、直接作成する方が高速な場合があります。
1つ目は、プラットフォーム別に読み込む必要があるダイナミック ライブラリをGodotに知らせるファイルで、gdexample.gdnlib と呼ばれます。
[general]

singleton=false
load_once=true
symbol_prefix="godot_"
reloadable=false

[entry]

X11.64="res://bin/x11/libgdexample.so"
Windows.64="res://bin/win64/libgdexample.dll"
OSX.64="res://bin/osx/libgdexample.dylib"

[dependencies]

X11.64=[]
Windows.64=[]
OSX.64=[]
このファイルには、モジュールの読み込み方法を制御する general セクションが含まれています。また、今のところ godot_ に残すべきプレフィックスセクションも含まれています。これを変更する場合は、エントリポイントとして使用されるさまざまな関数の名前を変更する必要があります。これは、動的ライブラリをデプロイできないiPhoneプラットフォーム用に追加されましたが、GDNativeモジュールは静的にリンクされています。
entry セクションは重要な要素です: サポートされている各プラットフォームのプロジェクトのファイルシステム内の動的ライブラリの場所をGodotに指示します。また、プロジェクトをエクスポートするときにそのファイルだけがエクスポートされるため、データパックにはターゲットプラットフォームと互換性のないライブラリは含まれません。
最後に、``dependencies``(依存関係)セクションでは、組み込みを許可する必要がある追加の動的ライブラリの名前を記載します。これは、GDNativeプラグインが他のユーザーのライブラリを実装し、サードパーティの動的ライブラリをプロジェクトに提供する必要がある場合に重要です。
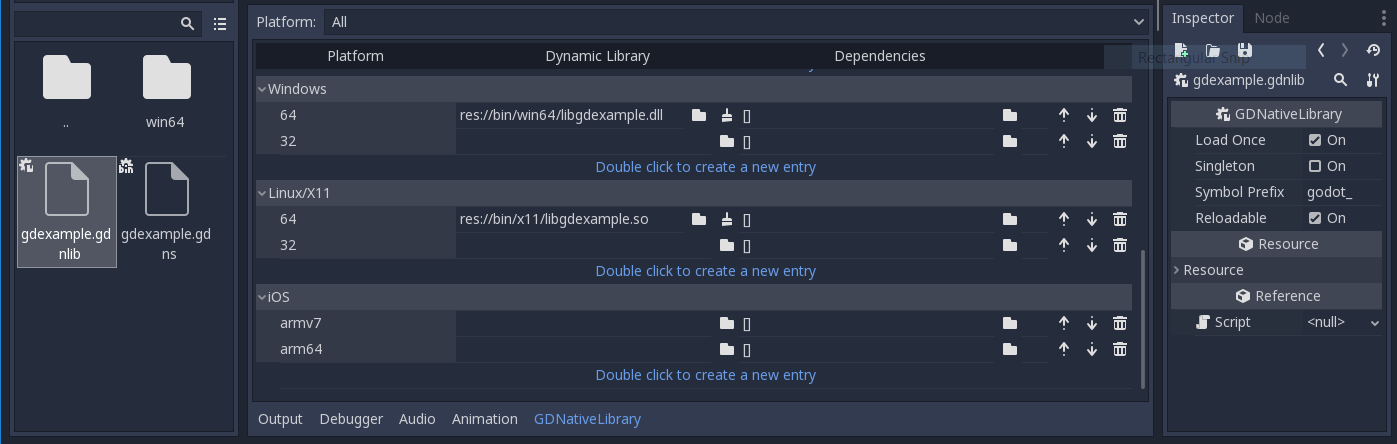
Godot内の gdexample.gdnlib ファイルをダブルクリックすると、さらに多くのオプションを設定できます:
作成する必要がある2番目のファイルは、プラグインに追加した各NativeScriptで使用されるファイルです。gdexampleのNativeScriptに gdexample.gdns という名前を付けます。
[gd_resource type="NativeScript" load_steps=2 format=2]

[ext_resource path="res://bin/gdexample.gdnlib" type="GDNativeLibrary" id=1]

[resource]

resource_name = "gdexample"
class_name = "GDExample"
library = ExtResource( 1 )
これは標準のGodotリソースです。シーンで直接作成することもできますが、ファイルに保存すると、他の場所で再利用するのがはるかに簡単になります。このリソースはgdnlibファイルを指しているため、どの動的ライブラリにNativeScriptが含まれているかを Godot が知ることができます。また、プラグイン内の使用したいNativeScriptを識別する class_name も定義します。
Godotに戻る時間です。最初に作成したメインシーンを読み込み、シーンにスプライトを追加します:
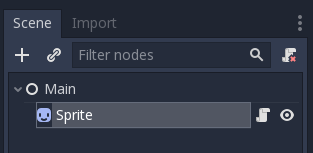
このスプライトに Godot ロゴをテクスチャとして割り当て、Centered プロパティを無効にし、gdexample.gdns ファイルをスプライトの Script プロパティにドラッグします。
プロジェクトを実行する準備ができました:
プロパティの追加
GDScriptでは、export キーワードを使用してスクリプトにプロパティを追加できます。GDNativeでは、プロパティを登録する必要があり、これを行う2つの方法があります。メンバーに直接バインドすることも、セッター関数とゲッター関数を使用することもできます。
注釈
第3のオプションもあります。GDScriptと同様に、オブジェクトの _get_property_list、_get および _set メソッドを直接実装できますが、このチュートリアルの範囲をはるかに超えています。
直接バインドする方法から始めて両方を調べます。波の振幅を制御できるプロパティを追加しましょう。
gdexample.h ファイルでは、次のようなメンバー変数を追加するだけです:
...
private:
    float time_passed;
    float amplitude;
...
gdexample.cpp ファイルでは、いくつかの変更を行う必要があります。変更するメソッドのみを表示しているので、省略されている行は削除しないでください:
void GDExample::_register_methods() {
    register_method("_process", &GDExample::_process);
    register_property<GDExample, float>("amplitude", &GDExample::amplitude, 10.0);
}

void GDExample::_init() {
    // initialize any variables here
    time_passed = 0.0;
    amplitude = 10.0;
}

void GDExample::_process(float delta) {
    time_passed += delta;

    Vector2 new_position = Vector2(
        amplitude + (amplitude * sin(time_passed * 2.0)),
        amplitude + (amplitude * cos(time_passed * 1.5))
    );

    set_position(new_position);
}
Once you compile the module with these changes in place, you will see that a property has been added to our interface. You can now change this property and when you run your project, you will see that our Godot icon travels along a larger figure.
注釈
Godotエディタが新しく追加されたプロパティを自動的に取得するには、gdexample.gdnlib ファイルの reloadable プロパティを rue に設定する必要があります。
However, this setting should be used with care, especially when tool classes are used, as the editor might hold objects then that have script instances attached to them that are managed by a GDNative library.
Let's do the same but for the speed of our animation and use a setter and getter
function. Our gdexample.h header file again only needs a few more lines of
code:
...
    float amplitude;
    float speed;
...
    void _process(float delta);
    void set_speed(float p_speed);
    float get_speed();
...
このために gdexample.cpp ファイルにさらにいくつかの変更を行う必要がありますが、ここでも変更されたメソッドのみを表示しているため、省略されているものを削除しないでください:
void GDExample::_register_methods() {
    register_method("_process", &GDExample::_process);
    register_property<GDExample, float>("amplitude", &GDExample::amplitude, 10.0);
    register_property<GDExample, float>("speed", &GDExample::set_speed, &GDExample::get_speed, 1.0);
}

void GDExample::_init() {
    // initialize any variables here
    time_passed = 0.0;
    amplitude = 10.0;
    speed = 1.0;
}

void GDExample::_process(float delta) {
    time_passed += speed * delta;

    Vector2 new_position = Vector2(
        amplitude + (amplitude * sin(time_passed * 2.0)),
        amplitude + (amplitude * cos(time_passed * 1.5))
    );

    set_position(new_position);
}

void GDExample::set_speed(float p_speed) {
    speed = p_speed;
}

float GDExample::get_speed() {
    return speed;
}
Now when the project is compiled, we'll see another property called speed. Changing its value will make the animation go faster or slower.
For this example, there is no obvious advantage of using a setter and getter. A good reason for a setter would be if you wanted to react on the variable being changed. If you don't need to do something like that, binding the variable is enough.
ゲッターとセッターは、オブジェクトの状態に基づいて追加の選択を行う必要がある、より複雑なシナリオではるかに役立ちます。
注釈
For simplicity, we've left out the optional parameters in the
register_property<class, type> method call. These parameters are
rpc_mode, usage, hint and hint_string. These can be used to
further configure how properties are displayed and set on the Godot side.
最新のC++コンパイラでは、クラスと変数の型を推測するので、register_property メソッドの <GDExample, float> 部分を省略できます。ただし、これについてはさまざまな経験があります。
シグナル
最後に、シグナルはGDNativeでも完全に機能します。モジュールが別のオブジェクトによって与えられたシグナルに反応するには、そのオブジェクトに対して connect を呼び出す必要があります。揺れるゴドーのアイコンのための良い例を考えることができませんので、もっと完全な例を紹介する必要があります。
This is the required syntax:
some_other_node->connect("the_signal", this, "my_method");
_register_methods メソッドで事前に登録した場合にのみ my_method を呼び出すことができることに注意してください。
Having your object sending out signals is more common. For our wobbling Godot icon, we'll do something silly just to show how it works. We're going to emit a signal every time a second has passed and pass the new location along.
In our gdexample.h header file, we need to define a new member time_emit:
...
    float time_passed;
    float time_emit;
    float amplitude;
...
gdexample.cpp の変更は今回はもう少し複雑です。まず、_init メソッドまたはコンストラクターで time_emit = 0.0; を設定する必要があります。ですが、他の2つは、必要な変更を1つずつ見ていきます。
In our _register_methods method, we need to declare our signal. This is done
as follows:
void GDExample::_register_methods() {
    register_method("_process", &GDExample::_process);
    register_property<GDExample, float>("amplitude", &GDExample::amplitude, 10.0);
    register_property<GDExample, float>("speed", &GDExample::set_speed, &GDExample::get_speed, 1.0);

    register_signal<GDExample>((char *)"position_changed", "node", GODOT_VARIANT_TYPE_OBJECT, "new_pos", GODOT_VARIANT_TYPE_VECTOR2);
}
Here, our register_signal method can be a single call first taking the
signals name, then having pairs of values specifying the parameter name and
type of each parameter we'll send along with this signal.
Next, we'll need to change our _process method:
void GDExample::_process(float delta) {
    time_passed += speed * delta;

    Vector2 new_position = Vector2(
        amplitude + (amplitude * sin(time_passed * 2.0)),
        amplitude + (amplitude * cos(time_passed * 1.5))
    );

    set_position(new_position);

    time_emit += delta;
    if (time_emit > 1.0) {
        emit_signal("position_changed", this, new_position);

        time_emit = 0.0;
    }
}
After a second has passed, we emit our signal and reset our counter. We can add
our parameter values directly to emit_signal.
Once the GDNative library is compiled, we can go into Godot and select our sprite node. In the Node dock, we can find our new signal and link it up by pressing the Connect button or double-clicking the signal. We've added a script on our main node and implemented our signal like this:
extends Node

func _on_Sprite_position_changed(node, new_pos):
    print("The position of " + node.name + " is now " + str(new_pos))
Every second, we output our position to the console.
次のステップ
上記は簡単な例にすぎませんが、基本を示してくれることを願っています。この例を基にして、C++を使用してGodotのノードを制御する本格的なスクリプトを作成できます。
To edit and recompile the plugin while the Godot editor remains open, re-run the project after the library has finished building.