3Dシーンのインポート
Godotシーンインポーター
3Dアセットを扱う場合、Godotには柔軟で設定可能なインポーターがあります。
Godotはシーンで動作します。つまり、お気に入りの3D DCCツールで作業しているシーン全体が、可能な限り同様な内容で転送されます。
Godotは、次の3Dシーンファイルフォーマットをサポートしています:
glTF 2.0 (recommended). Godot has full support for both text (
.gltf) and binary (.glb) formats.DAE(COLLADA)、完全にサポートされている古い形式です。
OBJ (Wavefront) format + their MTL material files. This is also fully supported, but pretty limited (no support for pivots, skeletons, animations, PBR materials, ...).
ESCN, a Godot-specific format that Blender can export with a plugin.
FBX, supported via the Open Asset Import library. However, FBX is proprietary, so we recommend using other formats listed above, if suitable for your workflow.
シーンファイルとテクスチャをプロジェクト・リポジトリにコピーするだけで、Godotは完全なインポートを行います。
これは重要なことですが、エクスポートする際にボーンがメッシュを変形させないようにしてください。お使いの3Dエディタからエクスポートする前にまず、スケルトンがTポーズなどデフォルトのポーズになっていること確認しましょう。
Mayaおよび3DS MaxからのDAEファイルのエクスポート
AutodeskはMayaと3DS MaxをCOLLADAに対応させましたが、しかしデフォルトでは壊れており、使わないほうが良いでしょう。COLLADAでのエクスポートするのに一番良いのはOpenCollada プラグインを使用することです。常にソフトの最新版に対応しているとは限りませんが、これはうまく動きます。
BlenderからglTF 2.0ファイルをエクスポートする
BlenderからglTFファイルをエクスポートするには3つの方法があります。 glTFバイナリ(.glb ファイル)、glTF埋め込み(.gltf ファイル)、およびテクスチャ(gltf + .bin + テクスチャ)。
glTFバイナリファイルは、3つのオプションのうちデータサイズが最小のものです。それらには、Blenderで設定されたメッシュとテクスチャが含まれます。 Godotに取り込むと、テクスチャはオブジェクトのマテリアルファイルの一部になります。
glTF埋め込みファイルは、バイナリ ファイルと同じように機能します。Godotでは追加機能が提供されず、ファイル サイズが大きいため使用しないでください。
テクスチャを分離してglTFを使用する理由は2つあります。 1つは、シーン記述はテキストベース形式にして、バイナリデータは別のバイナリファイルで持つことです。これは、テキストベース形式の変更をバージョン管理で確認する場合に役立ちます。 2番目は、マテリアルファイルとは別のテクスチャファイルが必要です。これらのglTFバイナリファイルのいずれも必要ない場合は問題ありません。
警告
Blend shape animations cannot be imported - they require manual animation within Godot.
注釈
Blender versions older than 3.2 do not export emissive textures with the glTF file. If your model uses one and you're using an older version of Blender, it must be brought in separately.
By default, Blender has backface culling disabled on materials and will export materials to match how they render in Blender. This means that materials in Godot will have their cull mode set to Disabled. This can decrease performance since backfaces will be rendered, even when they are being culled by other faces. To resolve this, enable Backface Culling in Blender's Materials tab, then export the scene to glTF again.
BlenderからDAEファイルをエクスポートする
BlenderにはCOLLADAサポートが組み込まれていますが、ゲームエンジンのニーズでは適切に機能しないため、そのままでは使用しないでください。
Godot provides a Blender plugin that will correctly export COLLADA scenes for use in Godot. It does not work in Blender 2.8 or newer, but there are plans to update it in the future.
BlenderからESCNファイルをエクスポートする
The most powerful one, called godot-blender-exporter. It uses a .escn file, which is kind of another name for a .tscn file (Godot scene file); it keeps as much information as possible from a Blender scene. However, it is considered experimental.
ESCNエクスポーターには、その機能と使用法を説明する詳細な ドキュメント があります。
Exporting textures separately
While textures can be exported with a model in certain file formats, such as glTF 2.0, you can also export them separately. Godot uses PBR (physically based rendering) for its materials, so if a texturing program can export PBR textures, they can work in Godot. This includes the Substance suite, ArmorPaint (open source), and Material Maker (open source).
注釈
For more information on Godot's materials, see 空間素材.
Exporting considerations
Since GPUs can only render triangles, meshes that contain quads or N-gons have to be triangulated before they can be rendered. Godot can triangulate meshes on import, but results may be unpredictable or incorrect, especially with N-gons. Regardless of the target application, triangulating before exporting the scene will lead to more consistent results and should be done whenever possible.
To avoid issues with incorrect triangulation after importing in Godot, it is recommended to make the 3D DCC triangulate objects on its own. In Blender, this can be done by adding a Triangulate modifier to your objects and making sure Apply Modifiers is checked in the export dialog. Alternatively, depending on the exporter, you may be able to find and enable a Triangulate Faces option in the export dialog.
To avoid issues with 3D selection in the editor, it is recommended to apply the object transform in the 3D DCC before exporting the scene.
ワークフローのインポート
Godot シーンインポーターでは、データのインポート方法に関するさまざまなワークフローを使用できます。多くのオプションに応じて、次の方法でシーンを読み込む場合があります:
外部マテリアル (デフォルト): 各マテリアルがファイル リソースに保存される場所。それらに対する変更は保持されます。
外部メッシュ: 各メッシュが別のファイルに保存される場所。多くのユーザーは、直接メッシュを扱うことを好みます。
外部アニメーション: ソースが変更されたときに、保存したアニメーションを変更およびマージできるようにします。
外部シーン: インポートされたシーンの各ルートノードを個別のシーンとして保存します。
シングルシーン: すべてが組み込まれた単一のシーンファイル。
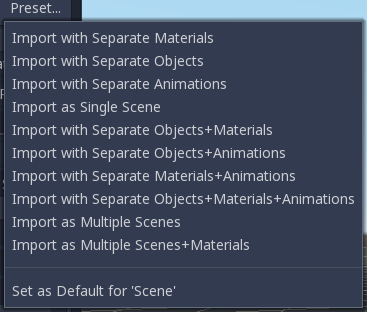
開発者によってニーズが異なるように、このインポートプロセスは高度にカスタマイズ可能です。
インポートオプション
インポーターには、以下で説明するいくつかのオプションがあります:
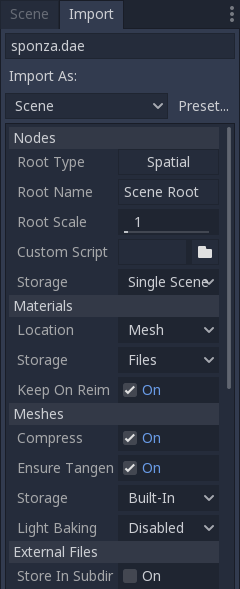
ノード
ルートの型
デフォルトでは、読み込まれたシーンのルート ノードのタイプは "Spatial" ですが、これは変更できます。
ルートの名前
生成されたルート ノードに特定の名前を設定できます。
ルートのスケール
ルートノードの大きさ。
カスタムスクリプト
インポート後にシーン全体を処理する特別なスクリプトを提供できます。これは、後処理、マテリアルの変更、ジオメトリの面白い処理などに最適です。
次のようなスクリプトを作成します:
tool # Needed so it runs in the editor.
extends EditorScenePostImport


func post_import(scene):
    # Do your stuff here.
    return scene # remember to return the imported scene
post_import 関数はインポートされたシーンを引数として取ります(パラメーターは実際にはシーンのルートノードです)。最終的に使用されるシーンを返す必要があります。別のものでもかまいません。
ストレージ
デフォルトでは、Godot は 1つのシーンを読み取りします。このオプションを使用すると、ルートの下にあるノードがそれぞれ別々のシーンになり、インポートされたシーンにインスタンス化されることを指定できます。
もちろん、このようなインポートされたシーンを他の場所に手動でインスタンス化することもできます。
マテリアル
位置
Godot は、メッシュまたはノード内のマテリアルをサポートします。デフォルトでは、マテリアルは各ノードに配置されます。
ストレージ
マテリアルは、シーン内または外部ファイルに格納できます。デフォルトでは、外部ファイルに保存されるため、編集が可能です。これは、ほとんどの3D DDC にはGodotのマテリアル・オプションと同じであるためです。
マテリアルがシーン内に組み込まれていると、ソース シーンが変更され、再インポートされるたびにマテリアルが失われます。
注釈
Godot will not reimport materials that are stored in external files unless
you remove the associated .material file before reimporting.
To force reimporting materials every time the 3D scene is reimported, change the material storage mode in the 3D scene by selecting it in the FileSystem dock, going to the Import dock then setting Material > Storage to Built-In instead of Files.
再インポート時に保持(Keep On Reimport)
Godotフィーチャーを使用するようにマテリアルを編集すると、インポーターは編集したフィーチャーを保持し、ソース シーンから送信されたものを無視します。このオプションは、マテリアルがファイルとして保存されている場合にのみ存在します。
メッシュ
圧縮
メッシュは、スペースを節約するためにメッシュの複数の側面に対してあまり正確でない数値を使用するようにします。
- これらは:
変換マトリックス(位置、回転、およびスケール): 32ビット浮動小数点数を16ビット符号付き整数にします。
頂点: 32ビット浮動小数点数から16ビット符号付き整数にします。
法線: 32ビット浮動小数点数から32ビット符号なし整数にします。
接線: 32ビット浮動小数点数から32ビット符号なし整数にします。
頂点の色: 32ビット浮動小数点数から32ビット符号なし整数にします。
UV: 32ビット浮動小数点数から32ビット符号なし整数にします。
UV2: 32ビット浮動小数点数から32ビット符号なし整数にします。
頂点ウェイト: 32ビット浮動小数点数から16ビット符号なし整数にします。
アーマチュア・ボーン: 32ビット浮動小数点数から16ビット符号なし整数にします。
配列インデックス: 要素数に応じた32ビットまたは16ビットの符号なし整数へ。
- 追加情報:
UV2 = 詳細テクスチャとベイク処理されたライトマップテクスチャの2番目のUVチャネル。
配列インデックス = 上記の配列の各要素に番号を付す数値の配列。つまり、頂点と法線に番号を付けます。
場合によっては、これにより精度が失われる可能性があるため、このオプションを無効にする必要があります。たとえば、メッシュが非常に大きい場合、または大きな領域をカバーする複数のメッシュがインポートされている場合、このメッシュのインポートを圧縮すると、ジオメトリまたは頂点が正確な場所にないことがあります。
接線の確保
If textures with normal mapping are to be used, meshes need to have tangent arrays. This option ensures that these are generated if not present in the source scene. Godot uses Mikktspace for this, but it's always better to have them generated in the exporter.
ストレージ
メッシュは、組み込みではなく別々のファイル (リソース) に格納できます。オブジェクトを直接ビルドする場合を除き、これはあまり実用的ではありません。
このオプションは、シーンの代わりに直接メッシュを操作することを好む人を支援するために提供されています。
ライトベーキング(Light Baking)
メッシュがベイク処理されたライトマップで使用されるかどうか。
無効(Disabled): メッシュはベイク処理されたライトマップでは使用されません。
有効(Enable): メッシュはベイク処理されたライトマップで使用されます。
ライトマップ生成(Gen Lightmaps): メッシュはベイク処理されたライトマップで使用され、ライトマップの第2UVレイヤーに展開します。
注釈
ライトのベイク処理の詳細については、ベイクドライトマップ(焼き込み済ライトマップ) を参照してください。
外部ファイル
生成されたメッシュとマテリアルは、必要に応じてシーンの名前を持つサブディレクトリに格納できます。
アニメーションオプション
Godotには、アニメーションデータの処理方法に関する多くのオプションがあります。一部のエクスポーター(Blenderなど)は、1つのファイルで多くのアニメーションを生成できます。 3DS MaxやMayaなどのその他のものでは、複数のアニメーションを同じタイムラインに配置するか、最悪の場合、各アニメーションを個別のファイルに配置する必要があります。
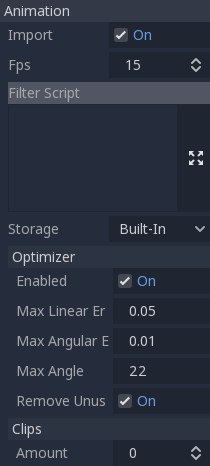
アニメーションのインポート(Import)はデフォルトで有効になっています。
注意
To modify animations from an imported 3D scene, you need to change the animation storage option from Built-In to Files in the Import dock. Otherwise, changes made to animations from Godot will be lost when the project is run.
フレームレート(FPS)
ほとんどの3Dエクスポート形式では、フレームではなく秒単位でアニメーションタイムラインを保存します。アニメーションを可能な限り忠実にインポートするには、編集に使用する1秒あたりのフレーム数を指定してください。これを行わないと、アニメーションが不安定になる場合があります。
スクリプトを絞り込む
特別な構文でフィルタースクリプトを指定して、どのアニメーションのどのトラックを保持するかを決定することができます。
フィルタスクリプトは、インポートされた各アニメーションに対して実行されます。構文は2種類のステートメントで構成されます。1つ目は、フィルタリングするアニメーションを選択するためのもので、2つ目は、一致するアニメーション内の個々のトラックをフィルタリングするためのものです。すべての名前パターンは、大文字と小文字を区別しないマッチパターンを使用して実行され、? および * ワイルドカードを使用します(String.matchn() を内部で使用しています)。
スクリプトは、(@ で始まる行で示される)アニメーション・フィルタ・ステートメントで開始する必要があります。たとえば、インポートされた、名前が ``"_Loop"``で終わるすべてのアニメーションにフィルタを適用する場合は:
@+*_Loop
同様に、追加のパターンをコンマで区切って同じ行に追加できます。これは、名前が"Arm_Left" で始まるすべてのアニメーションを追加し、そして"Attack" で終わる名前を持つすべてのアニメーションを除外する設定を追加した変更例です:
@+*_Loop, +Arm_Left*, -*Attack
アニメーション選択用のフィルタステートメントに続いて、トラック・フィルタリング・パターンを追加して、どのアニメーショントラックを保持または破棄するかを示します。トラック・フィルタ・パターンが指定されていない場合、一致するアニメーション内のすべてのトラックは破棄されます!
トラック・フィルタ・ステートメントは、アニメーション内の各トラックに順番に適用されることに注意することが重要です。これは、ある行のルールでトラックが追加されても、後のルールでそれを破棄できることを意味します。同様に、始めの方のルールによって除外されたトラックが、フィルタ・スクリプトのさらに下のルールによって再度追加される場合もあります。
例: "_Loop" で終わる名前を持つアニメーションにすべてのトラックを含めますが、名前に "arm" が含まれている場合を除き、"Skeleton" の ``"Control"``で終わっているトラックは破棄します:
@+*_Loop
+*
-Skeleton:*Control
+*Arm*
上記の例では、"Skeleton:Leg_Control" のようなトラックは破棄されますが、"Skeleton:Head" や Skeleton:Arm_Left_Control などのトラックは保持されます。
+ または - で始まらないトラック・フィルタ行は無視されます。
ストレージ
デフォルトでは、アニメーションは組み込みとして保存されます。代わりにファイルに保存できます。これにより、アニメーションにカスタムトラックを追加し、再読み込み後も保持できます。
オプティマイザー(Optimizer)
アニメーションがインポートされると、オプティマイザーが実行され、アニメーションのサイズが大幅に縮小されます。一般に、アニメーションが有効になっているためにアニメーションが壊れている疑いがない限り、これは常にオンにする必要があります。
クリップ
1つのタイムラインから複数のアニメーションをクリップとして指定することができます。この機能を使うためには、モデルには default という名前のアニメーションを 1 つだけ用意しなければなりません。クリップを作成するには、クリップの量をゼロよりも大きい値に変更してください。クリップに名前を付けて、どのフレームで開始し、どのフレームで停止するかを指定し、アニメーションをループさせるかどうかを選択することができます。
シーンの継承
多くの場合、インポートされたシーンに変更を加えることが望ましい場合があります。デフォルトでは、ソースアセットが変更された場合(ソース .dae、.gltf、.objファイルが3Dモデリングアプリから再エクスポートされた場合)、Godotはシーン全体を再インポートする必要があるため変更は出来ません。
ただし、シーンの継承(Scene Inheritance) を使用してローカルに変更することは可能です。インポートしたシーンを開こうとすると、次のダイアログが表示されます:
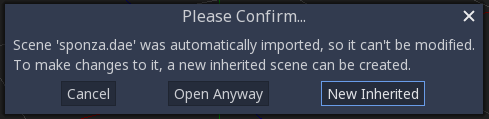
継承されたシーンでは、変更の唯一の制限は次のとおりです:
ノードは削除できません(ただし、どこにでも追加できます)。
サブリソースは編集できません(このために上記のように外部に保存します)
それ以外は、すべてが許可されています!
インポートのヒント
多くの場合、シーンを編集する場合、エクスポート後に実行する必要がある一般的なタスクがあります:
オブジェクトへのコリジョン検出の追加。
オブジェクトをナビゲーションメッシュとして設定する。
ゲーム エンジンで使用されていないノードの削除 (モデリングに使用される特定のライトなど)。
このワークフローを簡略化するために、Godotには3Dモデリング・ソフトウェアのオブジェクトの名前に追加できるサフィックスがいくつかあります。インポートすると、Godotはそれらのオブジェクトの名前のサフィックスを検出し、自動的にアクションを実行します。
注釈
All the suffixes described below are case-sensitive.
ノードの削除 (-noimp)
Objects that have the -noimp suffix will be removed at import-time no matter
what their type is. They will not appear in the imported scene.
Create collisions (-col, -convcol, -colonly, -convcolonly)
The option -col will work only for Mesh objects. If it is detected, a child
static collision node will be added, using the same geometry as the mesh. This
will create a triangle mesh collision shape, which is a slow, but accurate
option for collision detection. This option is usually what you want for level
geometry (but see also -colonly below).
The option -convcol will create a ConvexPolygonShape instead of
a ConcavePolygonShape. Unlike triangle meshes which can be concave,
a convex shape can only accurately represent a shape that doesn't have any
concave angles (a pyramid is convex, but a hollow box is concave). Due to this,
convex collision shapes are generally not suited for level geometry. When
representing simple enough meshes, convex collision shapes can result in better
performance compared to a triangle collision shape. This option is ideal for
simple or dynamic objects that require mostly-accurate collision detection.
However, in both cases, the visual geometry may be too complex or not smooth enough for collisions. This can create physics glitches and slow down the engine unnecessarily.
To solve this, the -colonly modifier exists. It will remove the mesh upon
importing and will create a StaticBody collision instead.
This helps the visual mesh and actual collision to be separated.
The option -convcolonly works in a similar way, but will create a ConvexPolygonShape instead.
The option -colonly can also be used with Blender's empty objects.
On import, it will create a StaticBody with
a collision node as a child. The collision node will have one of a number of predefined shapes,
depending on Blender's empty draw type:
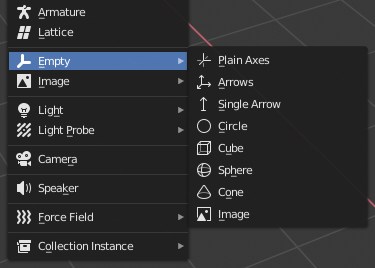
単一の矢印(Single arrow)は RayShape を作成します。
キューブは BoxShape を作成します。
イメージ PlaneShape を作成します。
球、(およびリストされていない他のもの)は SphereShape を作成します。
When possible, try to use a few primitive collision shapes instead of triangle mesh or convex shapes. Primitive shapes often have the best performance and reliability.
注釈
For better visibility in Blender's editor, you can set the "X-Ray" option on collision empties and set some distinct color for them in Blender's User Preferences > Themes > 3D View > Empty.
参考
See Collision shapes (3D) for a comprehensive overview of collision shapes.
VehicleBodyの作成(-vehicle)
A mesh node with the -vehicle suffix will be imported as a child to a
VehicleBody node.
VehicleWheelの作成[-wheel)
A mesh node with the -wheel suffix will be imported as a child to a
VehicleWheel node.
リジッドボディ(-rigid)
A mesh node with the -rigid suffix will be imported as a RigidBody.
アニメーションループ(-loop、-cycle)
``loop``または ``cycle``トークンで開始または終了するCOLLADAドキュメント内のアニメーションクリップは、ループフラグが設定されたGodotアニメーションとしてインポートされます。これは上記で示したような他のサフィックスとは違い、ハイフンは不要です。
In Blender, this requires using the NLA Editor and naming the Action with the loop or
cycle prefix or suffix.