Using TileMaps
はじめに
A tilemap is a grid of tiles used to create a game's layout. There are several benefits to using TileMap nodes to design your levels. First, they make it possible to draw the layout by "painting" the tiles onto a grid, which is much faster than placing individual Sprite nodes one by one. Second, they allow for much larger levels because they are optimized for drawing large numbers of tiles. Finally, you can add collision, occlusion, and navigation shapes to tiles, adding additional functionality to the TileMap.
プロジェクトの設定
This demo will use the following tiles taken from Kenney's "Abstract Platformer" art pack. You can find the complete set here but for this demo we'll stick to this small set.
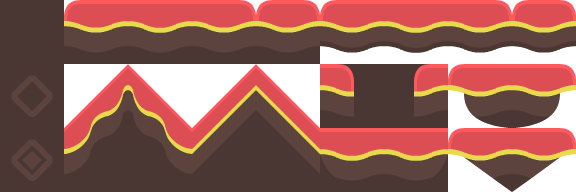
新しいプロジェクトを作成し、プロジェクトフォルダに上記の画像を配置します。
タイルセットを使用する場合、隣接するタイルが一致することが重要です。 Godotのデフォルトでは、補間された "Filter" モードを使用して2D画像をインポートします。これにより、タイル間の境界が見苦しくなります。画像を選択し、[インポート]タブをクリックします。Filter をオフにして、[再インポート]をクリックします。詳細については、イメージのインポート を参照してください。
TileMap ノード
シーンに新しい TileMap ノードを追加します。デフォルトでは、TileMapはタイルの正方形グリッドを使用します。パースペクティブベースの "Isometric" モードを使用したり、独自のカスタムタイル形状を定義することもできます。

インスペクタの "Cell" セクションに、タイルマップの動作をカスタマイズするために調整できる多くのプロパティがあります:
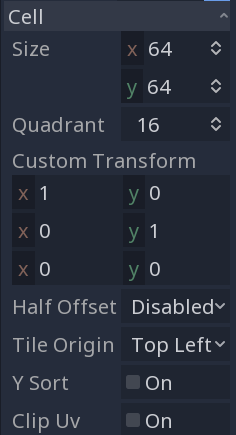
Cell Sizeこれで、グリッドのサイズを定義します。タイルのピクセルサイズと一致させる必要があります。デフォルト値は
(64, 64)です。
YSortこれにより、タイルが
Y位置の順に描画されるため、「低い」タイルが「高い」タイルの上に描画されます。
Half OffsetとTile Originこれらのプロパティは、グリッドの位置に対するタイルの位置に影響します。
Quadrantバッチ描画に使用されるチャンクサイズを定義します。これはパフォーマンスに悪影響を及ぼす可能性があります。何をしているか分からない限り、変更しないでください。
Custom Transformタイルの形状を変更するために使用されます。正方形でないタイルがある場合にこれを使用します。
これらのオプションはすべて、このデモのデフォルトのままにしておくことができます。
タイルセットの作成
タイルマップを構成したら、TileSetを追加します。TileSet は、タイルに関するデータ(テクスチャ、衝突形状、その他のプロパティ)を含む Resource です。ゲームを実行すると、TileMapは個々のタイルを1つのオブジェクトに結合します。
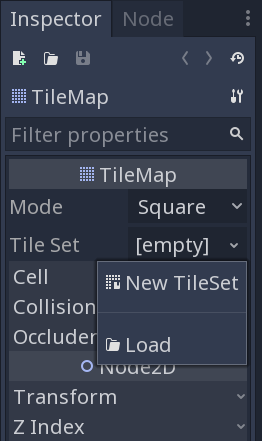
新しいTileSetを追加するには、「Tile Set」プロパティをクリックして、「新規 TileSet」を選択します。
Click on the TileSet property, and the "TileSet" panel will open at the bottom of the editor window:
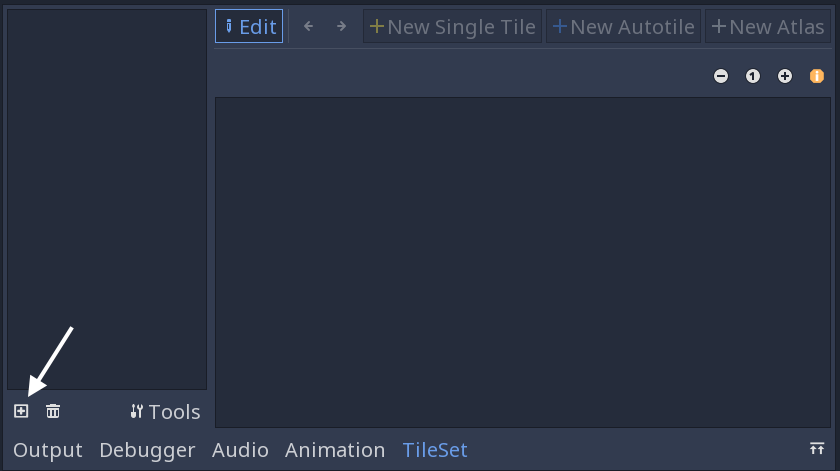
最初に、タイルに使用するテクスチャを追加する必要があります。"Add Texture(s) to TileSet" ボタンをクリックして、tilesheet.png 画像を選択します。
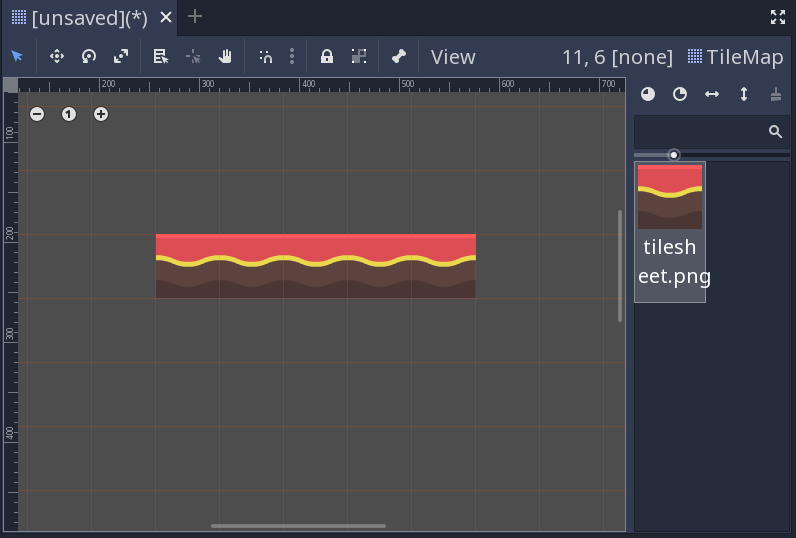
次に、"New Single Tile" をクリックし、画像内にドラッグして目的のタイルを選択します。 [スナップを有効にする]ボタンをクリックして、タイル全体を選択しやすくします。選択したタイルの周りに黄色の長方形が表示されます。
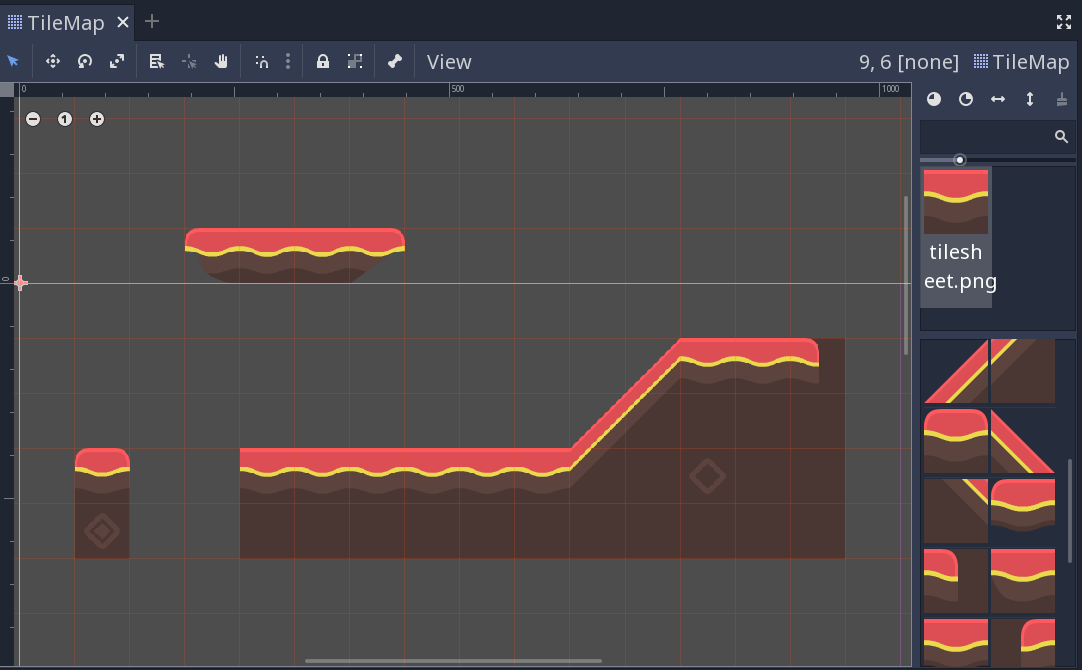
シーンツリーでTileMapをクリックすると、新しく作成されたタイルが右側に表示されることがわかります。ビューポートをクリックすると、タイルを配置できます。右クリックしてそれらを削除します。
誤ってタイルマップノードを選択して移動してしまうことがあります。これを回避するには、ノードのロックボタンを使用します:

コリジョン形状
壁、床、またはその他の障害物などの衝突を必要とするマップを作成している場合は、「ソリッド」と見なされるタイルに衝突形状を追加する必要があります。
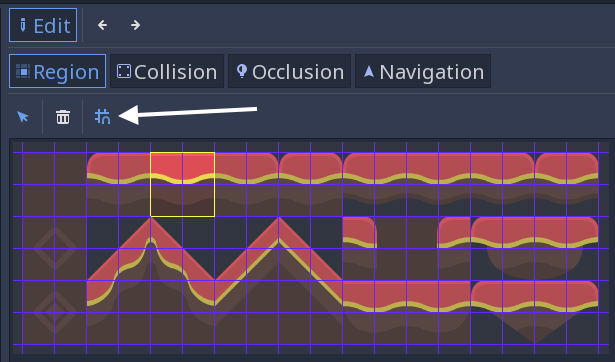
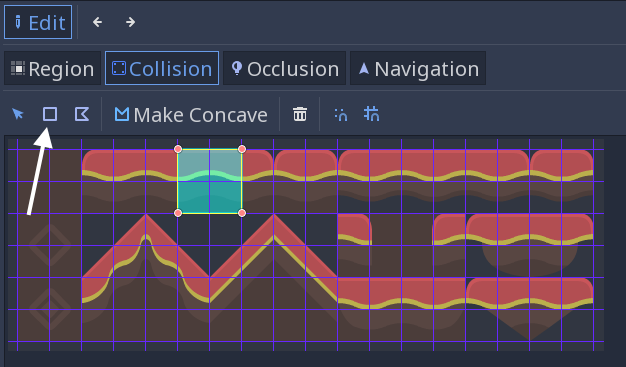
エディタウィンドウの下部にある "TileSet" をクリックして、タイルセットツールに戻ります。以前に定義したタイルをクリックします(黄色のアウトライン)。 "Collision" タブを選択し、"Create a new rectangle" ボタンをクリックします。グリッドスナップが有効になっていることを確認してから、タイルをクリックしてドラッグします。正方形の衝突形状が水色で表示されます:
同じ方法で、オクルージョンとナビゲーションシェイプをタイルに追加できます。
アトラスタイル
Rather than adding individual tiles one at a time, you can define a group of tiles all at once using an atlas. This also allows you to randomly generate tiles from the group.
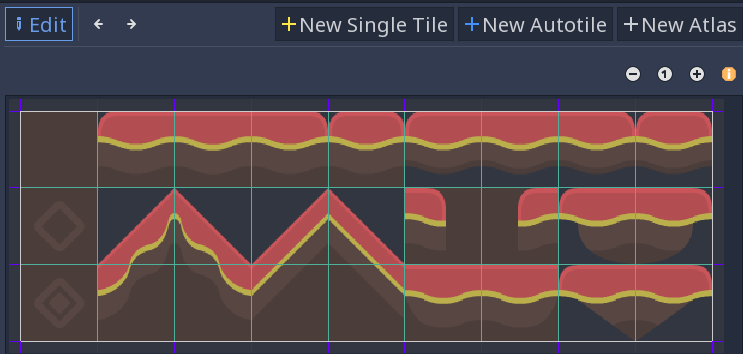
Click "New Atlas" and drag to select the entire tile sheet.
まだ設定していない場合は、スナップ設定の "Step" を (64, 64) に変更してください。変更しないと、タイルが細かく切り刻まれます。これはインスペクタで見つけることができます:

アトラスを定義したら、以前と同様に個々のタイルに衝突形状を追加できます。 "Icon" をクリックして、アトラスを表すタイルの1つを選択することもできます。
TileMapに戻って、アトラスタイルを選択すると、そこに含まれるすべてのタイルが表示されます。
これは、タイルを定義するときの時間を節約することに加えて、多数のタイルで作業しているときに類似のタイルをグループ化することで役立ちます。
Random tile priorities
When drawing with atlas tiles, enabling the "Use priority" option causes tiles to be selected at random. By default, each tile in the tileset has an equal likelihood of occurring. You can change the likelihood by setting different priorities for each tile. For example, a tile with priority 2 is twice as likely to be selected as a tile with priority 1, and a tile with priority 3 is 50% more likely to be selected than a tile with priority 2.
Autotiles
Autotiles allow you to define a group of tiles, then add rules to control which tile gets used for drawing based on the content of adjacent cells.
Click "New Autotile" and drag to select the tiles you wish to use. You can add collisions, occlusion, navigation shapes, tile priorties, and select an icon tile in the same manner as for atlas tiles.
Tile selection is controlled by bitmasks. Bitmasks can be added by clicking "Bitmask", then clicking parts of the tiles to add or remove bits in the mask. Left-clicking an area of the tile adds a bit, right-click removes "off", and shift-left-click sets an "ignore" bit.
Whenever Godot updates a cell using an autotile, it first creates a pattern based on which adjacent cells are already set. Then, it searches the autotile for a single tile with a bitmask matching the created pattern. If no matching bitmask is found, the "icon" tile will be used instead. If more than one matching bitmask is found, one of them will be selected randomly, using the tile priorities.
The rules for matching a bitmask to a pattern depend on the tileset's autotile bitmask mode. This can be set in the "Inspector" tab, under the "Selected Tile" heading. Allowed values are "2x2", "3x3 (minimal)", and "3x3".
All "on" and "off" bits must be satisfied for a bitmask to match, but "ignore" bits are ignored.
2x2
In 2x2 mode, each bitmask contains four bits, one for each corner.
Where a bit is "on", all cells connected to that corner must be filled using the same autotile, in order for the bitmask to match. For example, if the top-left bit is set, the cell directly above, directly left, and diagonally above-left must be filled.
Where a bit is "off", at least one cell connected to that corner must not be set using the same autotile.
At least one bit must be set for the tile to be used, so a total of 15 tiles would be needed to provide exactly one tile for each arrangement that this mode can test for.
2x2 mode can only match cells that are part of a 2-by-2 block - cells with no neighbors and lines only one cell wide are not supported.
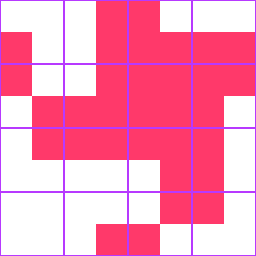
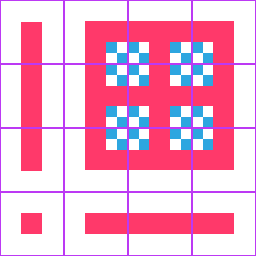
Template - Generic:
This template can be used for sideways or fully top-down perspectives. It's designed for a TileMap cell size of 64x64.
Key:
Red: "on"
White: "off"
3x3 (ミニマル)
In 3x3 (minimal) mode, each bitmask contains 9 bits (4 corners, 4 edges, 1 center). The 4 corner bits work the same as in 2x2 mode.
When an edge bit is "on", the cell which shares that edge must be filled. When an edge bit is "off", the cell which shares that edge must be empty.
The center bit should be "on" for any tile you wish to use. Note that in this mode, it makes no sense for a corner bit to be "on" when either edge bit adjacent to it is not "on".
A total of 47 tiles would be needed to provide exactly one bitmask for each arrangement that this mode can test for.
注釈
Right-click an image and choose Save image as… to save it.
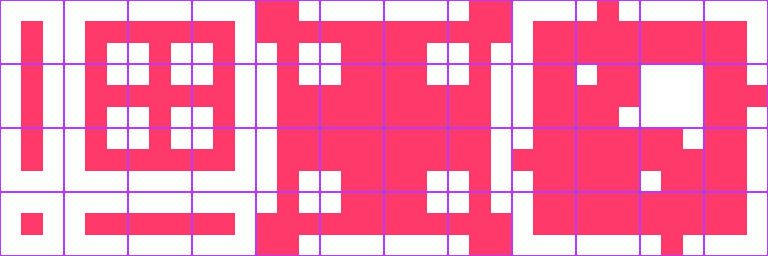
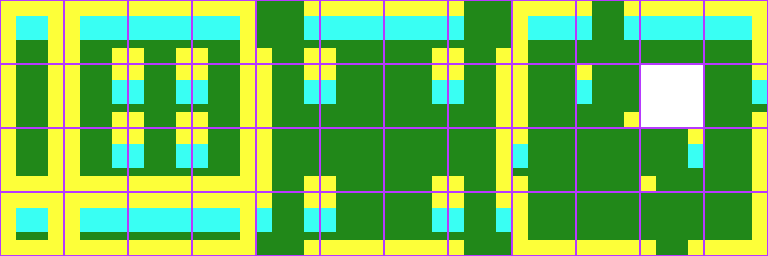
Template - Generic:
This template can be used for sideways or fully top-down perspectives. All templates below are designed for a TileMap cell size of 64x64, but you may have to use different subtile sizes for top-down templates as described below.
Key:
Red: "on"
White: "off"
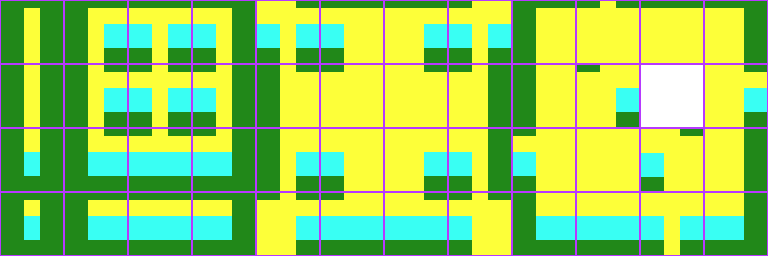
Template - Generic 16 tiles:
This template can be used for tilesets that only have 16 tiles - for simpler art styles the missing tiles will not be noticeable.
Key:
Red: "on"
White: "off"
Blue-checkered: "ignore"
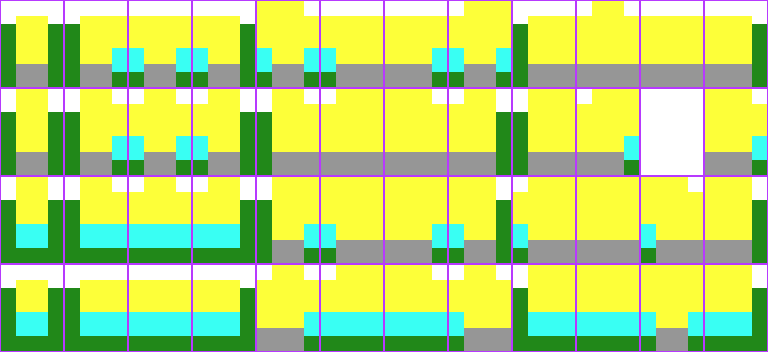
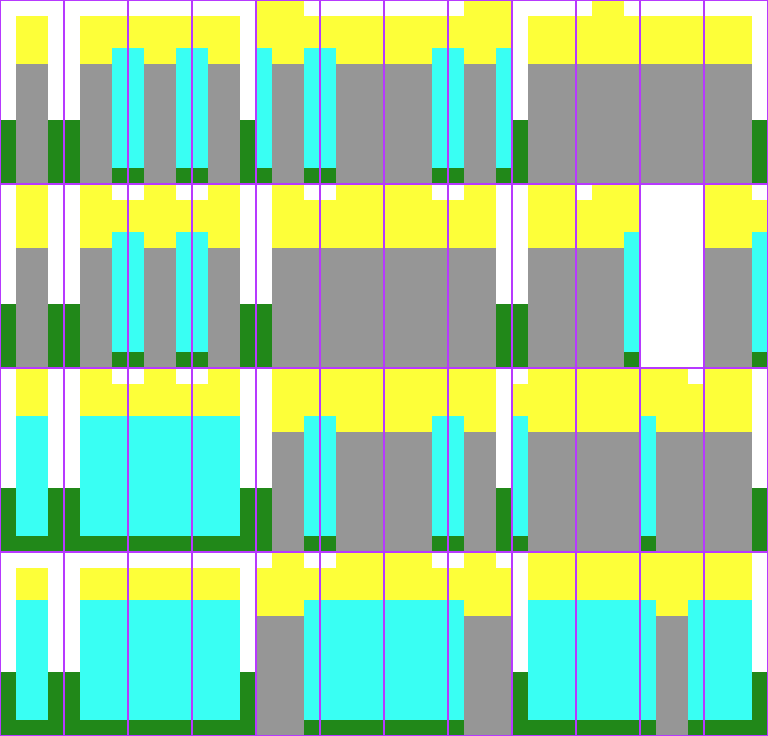
Template - Top-down floor in 3/4 perspective:
Key (applies to the four templates below):
Green: floor
Cyan: wall
Yellow: top of wall
Grey: hidden due to overlap
Transparent: air
Template - Top-down wall in 3/4 perspective:
Template - Top-down wall in 3/4 perspective (thick walls):
When using this template, set the TileSet subtile size to Vector2(64, 88).
Template - Top-down wall in 3/4 perspective (tall walls):
When using this template, set the "Snap Options" Step to Vector2(64, 184)
and the "Selected Tile" Texture offset to height minus the cell size.
This means the texture offset should be Vector2(0, -120):
3x3
In 3x3 mode, each bitmask contains 9 bits (4 corners, 4 edges, 1 center)
Each bit checks a single adjacent cell. Corner bits only check diagonally adjacent cells. The center bit should be "on" for any tile you wish to use.
A total of 256 tiles would be needed to provide exactly one bitmask for each arrangement that this mode can test for.
Disabling autotile
When using an autotile, it is possible to turn off the autotile behaviour and select tiles manually, by clicking "Disable Autotile" at the top of the tile selection window.
Autotile binding
By default, autotile only checks for adjacent cells filled using the same autotile. This behaviour can be overridden in order to have autotiles bind to each other, or even bind to empty cells. At present, this can only be done through scripting. You will need to add a script to your tileset, and define a function named "_is_tile_bound(drawn_id, neighbor_id)". This function will be called for each adjacent cell that does not contain the same autotile, and should return true if you want the drawn cell to "bind" to the neighbor cell. You can find the id of an autotile using "find_tile_by_name(name)", empty cells are given an id of -1.
Note that to use this in the editor, the script should start with a "tool" declaration, and you may need to close and reload the scene for these changes to take effect.
ヒントとテクニック
If you're using a Camera2D to scroll your level, you may notice lines appearing between your tiles. To fix this, open Project Settings and enable Use Gpu Pixel Snap in the Rendering > 2d > Snapping section.
エディタの右上にあるアイコンを使用して、タイルを反転および回転できます。
直線を描くには、Shift を押しながらタイルをクリックしてドラッグします。
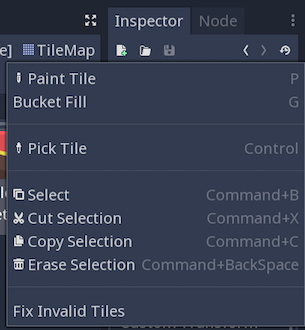
コピー、貼り付け、バケット塗りつぶしなどのツールは、右上の "TileMap" メニューにあります。