2Dスプライトアニメーション
はじめに
In this tutorial, you'll learn how to create 2D animated characters with the AnimatedSprite class and the AnimationPlayer. Typically, when you create or download an animated character, it will come in one of two ways: as individual images or as a single sprite sheet containing all the animation's frames. Both can be animated in Godot with the AnimatedSprite class.
First, we'll use AnimatedSprite to animate a collection of individual images. Then we will animate a sprite sheet using this class. Finally, we will learn another way to animate a sprite sheet with AnimationPlayer and the Animation property of Sprite.
注釈
次のサンプルのアートは https://opengameart.org/users/ansimuz および https://opengameart.org/users/tgfcoder から入手しました
AnimatedSpriteと個々の画像
このシナリオでは、キャラクターのアニメーションフレームを1つづつ含む複数の画像を使います。この例では、次のアニメーションを使用します:

画像はこちらからダウンロードできます: run_animation.zip
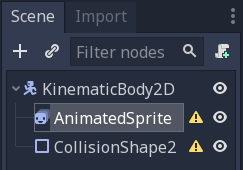
画像を解凍し、プロジェクトフォルダに配置します。次のノードを使用してシーンツリーを設定します:
注釈
ルートノードは、Area2D または RigidBody2D にすることもできます。アニメーションは引き続き同じ方法で作成されます。アニメーションが完成したら、CollisionShape2Dにシェイプを割り当てることができます。詳細については、Physics Introduction を参照してください。
次に、AnimatedSprite を選択し、その SpriteFrames プロパティで「新規 SpriteFrames」を選択します。
新しいSpriteFramesリソースをクリックすると、エディタウィンドウの下部に新しいパネルが表示されます:
左側のFileSystemドックから、8つの個別の画像をSpriteFramesパネルの中央部分にドラッグします。左側で、アニメーションの名前を "default" から "run" に変更します。
インスペクタに戻り、Playing プロパティのチェックボックスをオンにします。これで、アニメーションがビューポートで再生されます。しかし、それは少し遅いです。この問題を解決するには、SpriteFramesパネルの Speed(FPS) 設定を10に変更します。
[新規アニメーション]ボタンをクリックして画像を追加すると、アニメーションを追加できます。
アニメーションのコントロール
アニメーションが完了すると、play() メソッドと stop() メソッドを使用して、コードでアニメーションを制御できます。右矢印キーを押したままアニメーションを再生し、キーを放したときにアニメーションを停止する簡単な例を次に示します。
extends KinematicBody2D

onready var _animated_sprite = $AnimatedSprite

func _process(_delta):
    if Input.is_action_pressed("ui_right"):
        _animated_sprite.play("run")
    else:
        _animated_sprite.stop()
public class Character : KinematicBody2D
{
    private AnimatedSprite _animatedSprite;

    public override void _Ready()
    {
        _animatedSprite = GetNode<AnimatedSprite>("AnimatedSprite");
    }

    public override _Process(float _delta)
    {
        if (Input.IsActionPressed("ui_right"))
        {
            _animatedSprite.Play("run");
        }
        else
        {
            _animatedSprite.Stop();
        }
    }
}
AnimatedSpriteを使用したスプライトシート
You can also easily animate from a sprite sheet with the class AnimatedSprite. We will use this public domain sprite sheet:
画像を右クリックして[名前を付けて保存]を選択してダウンロードし、イメージをプロジェクトフォルダにコピーします。
Set up your scene tree the same way you did previously when using individual images. Select the AnimatedSprite and in its SpriteFrames property, select
"New SpriteFrames".
Click on the new SpriteFrames resource. This time, when the bottom panel appears, select "Add frames from a Sprite Sheet".
You will be prompted to open a file. Select your sprite sheet.
A new window will open, showing your sprite sheet. The first thing you will need to do is to change the number of vertical and horizontal images in your sprite sheet. In this sprite sheet, we have four images horizontally and two images vertically.
Next, select the frames from the sprite sheet that you want to include in your animation. We will select the top four, then click "Add 4 frames" to create the animation.
You will now see your animation under the list of animations in the bottom panel. Double click on default to change the name of the animation to jump.
Finally, check Playing on the AnimatedSprite in the inspector to see your frog jump!
AnimationPlayerのスプライトシート
スプライトシートを使用するときにアニメーション化を行うもう1つの方法は、標準の Sprite ノードを使用してテクスチャを表示し、次に AnimationPlayer でテクスチャからテクスチャへの変更をアニメートすることです。
6フレームのアニメーションを含むこのスプライトシートを考えてみましょう。

画像を右クリックして[名前を付けて保存]を選択してダウンロードし、イメージをプロジェクトフォルダにコピーします。
私たちの目標は、これらの画像をループで次々に表示することです。シーンツリーを設定することから始めます。

注釈
ルートノードは、Area2D または RigidBody2D にすることもできます。アニメーションは引き続き同じ方法で作成されます。アニメーションが完成したら、CollisionShape2Dにシェイプを割り当てることができます。詳細については、Physics Introduction を参照してください。
スプライトシートをスプライトの Texture プロパティにドラッグすると、シート全体が画面に表示されます。個々のフレームにスライスするには、インスペクタの Animation セクションを展開し、Hframes を 6 に設定します。Hframes および Vframes は、スプライトシート内の水平フレームと垂直フレームの数です。
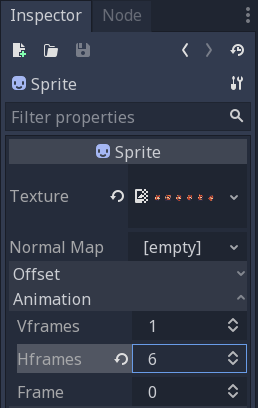
次に、Frame プロパティの値を変更してみてください。範囲が 0 から 5 であり、それに応じてスプライトによって表示される画像が変化することがわかります。これが、アニメーション化のプロパティです。
AnimationPlayer を選択し、[アニメーション] ボタンをクリックしてから [新規] をクリックします。新しいアニメーションに「walk」という名前を付けます。アニメーションの長さを 0.6 に設定し、[ループ] ボタンをクリックして、アニメーションが繰り返されるようにします。
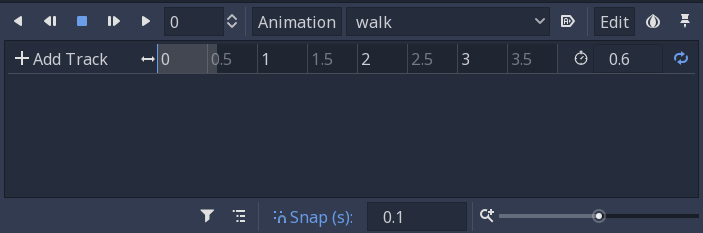
次に、Sprite ノードを選択し、鍵のアイコンをクリックして新しいトラックを追加します。

タイムラインの各ポイント(デフォルトでは 0.1秒刻み)で、0から5までのすべてのフレームが追加されるまで、鍵アイコンをクリックしてフレームの追加を続けます。アニメーショントラックに実際にフレームが表示されます:
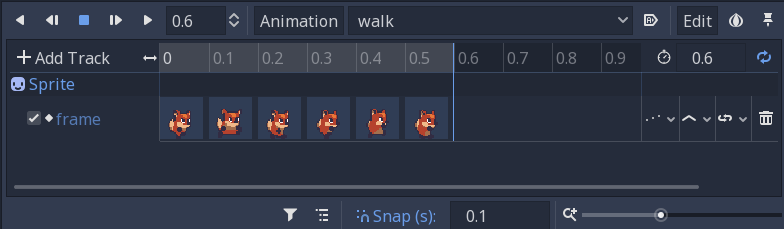
アニメーションの [再生] をクリックすると、アニメーションがどのように表示されるかを確認できます。

AnimationPlayerアニメーションの制御
AnimatedSpriteと同様に、play() メソッドと stop() メソッドを使用して、コードを介してアニメーションを制御できます。ここでも、右矢印キーを押したままアニメーションを再生し、キーを放したときにアニメーションを停止する例を次に示します。
extends KinematicBody2D

onready var _animation_player = $AnimationPlayer

func _process(_delta):
    if Input.is_action_pressed("ui_right"):
        _animation_player.play("walk")
    else:
        _animation_player.stop()
public class Character : KinematicBody2D
{
    private AnimationPlayer _animationPlayer;

    public override void _Ready()
    {
        _animationPlayer = GetNode<AnimationPlayer>("AnimationPlayer");
    }

    public override void _Process(float _delta)
    {
        if (Input.IsActionPressed("ui_right"))
        {
            _animationPlayer.Play("walk");
        }
        else
        {
            _animationPlayer.Stop();
        }
    }
}
注釈
アニメーションと個別のプロパティの両方を一度に更新する場合 (たとえば、プラットフォームゲームの場合、「ターン」アニメーションの開始中に、キャラクタの方向転のために、スプライトの h_flip/v_flip プロパティを更新する場合があります)、play() では即座に適用されないことに注意してください。代わりに、次回 AnimationPlayer が処理されるときに適用されます。この更新は次のフレームで確定するので、プロパティの更新は行われていても、それがアニメーションには適用されていない「グリッチ」フレームが発生する可能性があります。これが問題であることが判明した場合は、play() を呼び出した後に advance(0) を呼び出すことでアニメーションをすぐに更新することができます。
概要
These examples illustrate the two classes you can use in Godot for
2D animation. AnimationPlayer is
a bit more complex than AnimatedSprite, but it provides additional functionality, since you can also
animate other properties like position or scale. The class AnimationPlayer can also be used with an AnimatedSprite. Experiment to see what works best for your needs.