High-level multiplayer
High-level vs low-level API
以下では、Godotの高レベルネットワークと低レベルネットワークの違いといくつかの基本事項について説明します。基本をとばして最初のノードにネットワークを追加する場合は、以下の Initializing the network までスキップしてください。ただし、後で残りも読んでください!
Godotは、UDP、TCP、およびSSLやHTTPなどの一部の高レベルプロトコルを介した標準の低レベルネットワークを常にサポートしてきました。これらのプロトコルは柔軟性があり、ほとんどすべてに使用できます。ただし、ゲームの状態を手動で同期するためにそれらを使用すると、多大な作業が必要になる場合があります。バックエンドでカスタムサーバー実装を使用する場合など、その作業を回避できない場合や、そうするほうが価値がある場合があります。しかし、ほとんどの場合、使いやすさを高めるために低レベルネットワークのきめ細かな制御の一部を犠牲にしてでも、Godotの高レベルネットワークAPIを検討する価値があります。
これは、低レベルプロトコルの固有の制限によるものです:
TCPは、パケットが常に確実に順序どおりに到着することを保証しますが、一般に、エラー修正のために待ち時間が長くなります。また、手順に「接続(connection)」を必要とし、マルチプレイヤーゲームのようなアプリケーションには向かない目的に合わせて最適化されているので、非常に複雑なプロトコルでもあります。パケットはより大きなバッチで送信されるようにバッファリングされ、パケットごとのオーバーヘッドが少なくなり、待ち時間が長くなります。これはHTTPのようなものには便利ですが、一般的にはゲームには役立ちません。この一部は、(例えば、TCP接続の「Nagleのアルゴリズム」を無効にすることによって)設定および無効にすることができます。
UDPはより単純なプロトコルであり、パケットのみを送信します(「接続」の概念はありません)。エラー修正を行わないので処理がかなり速くなりますが(低遅延)、パケットは途中で失われたり、間違った順序で受信されたりする可能性があります。それに加えて、UDPのMTU(最大パケットサイズ)は一般的に小さい(数百バイトのみ)ため、大きなパケットを送信することは、パケットを分割し、再編成し、一部が失敗した場合に再試行することを意味します。
一般に、TCPは信頼性が高く、順序があり、低速であると考えることができます。それに対し、UDPは信頼性がなく、順序がなく、高速であるといえます。パフォーマンスが大きく異なるため、多くの場合、ゲームに必要なTCPの部分(オプションの信頼性とパケット順序)を再構築し、不要な部分(輻輳/トラフィック制御機能、Nagleのアルゴリズムなど)を回避することは理にかなっています。このため、ほとんどのゲームエンジンにはこのような実装が付属しており、Godotも例外ではありません。
要約すると、低レベルのネットワークAPIを使用して最大限の制御を行い、すべてを素のネットワークプロトコルの上に実装するか、または `SceneTree <class_SceneTree>`に基づいた高レベルAPIを使用するかです。これは、一般的に最適化された方法で、シーンの後ろで重い処理を引き受けます。
注釈
Most of Godot's supported platforms offer all or most of the mentioned high- and low-level networking features. As networking is always largely hardware and operating system dependent, however, some features may change or not be available on some target platforms. Most notably, the HTML5 platform currently offers WebSockets and WebRTC support but lacks some of the higher-level features, as well as raw access to low-level protocols like TCP and UDP.
注釈
More about TCP/IP, UDP, and networking: https://gafferongames.com/post/udp_vs_tcp/
Gaffer On Games has a lot of useful articles about networking in Games (here), including the comprehensive introduction to networking models in games.
Godotの組み込みネットワークではなく、選択した低レベルネットワークライブラリを使用する場合は、次の例を参照してください: https://github.com/PerduGames/gdnet3
警告
ゲームにネットワークを追加するには、ある程度の責任が伴います。間違って実行すると、アプリケーションが脆弱になり、チートや悪用につながる可能性があります。攻撃者がアプリケーションを実行しているマシンを危険にさらし、サーバーを使用してスパムを送信したり、他のユーザーを攻撃したり、ユーザーがゲームをプレイしている場合にユーザーデータを盗んだりすることもできます。
これは、ネットワーキングが関係する場合に常に当てはまり、Godotとは関係ありません。もちろん実験はできますが、ネットワークアプリケーションをリリースするときは、考えられるセキュリティ上の問題に常に注意してください。
中レベルの抽象化
ネットワークを介してゲームを同期する方法に入る前に、同期のための基本のネットワークAPIがどのように機能するかを理解しておくと役立ちます。
Godot uses a mid-level object NetworkedMultiplayerPeer. This object is not meant to be created directly, but is designed so that several C++ implementations can provide it.
このオブジェクトは PacketPeer から継承されるため、データのシリアル化、送信、受信に役立つすべてのメソッドを引き継ぎます。さらに、ピア、転送モードなどを設定するメソッドを追加します。また、ピアが接続または切断したときに通知するシグナルも含まれています。
This class interface can abstract most types of network layers, topologies and libraries. By default, Godot provides an implementation based on ENet (NetworkedMultiplayerEnet), one based on WebRTC (WebRTCMultiplayer), and one based on WebSocket (WebSocketMultiplayerPeer), but this could be used to implement mobile APIs (for ad hoc WiFi, Bluetooth) or custom device/console-specific networking APIs.
ほとんどの場合、Godotはさらに高度なネットワーク機能を提供するため、このオブジェクトを直接使用することはお勧めしません。 それでも、ゲームに低レベルAPIの特定のニーズがある場合に利用できます。
ネットワークの初期化
Godotでネットワークを制御するオブジェクトは、ツリー関連のすべてを制御するオブジェクトと同じです: SceneTree。
To initialize high-level networking, the SceneTree must be provided a NetworkedMultiplayerPeer object.
そのオブジェクトを作成するには、最初にサーバーまたはクライアントとして初期化する必要があります。
指定された最大ピア数を使用して、指定されたポートでリッスンするサーバーとして初期化します:
var peer = NetworkedMultiplayerENet.new()
peer.create_server(SERVER_PORT, MAX_PLAYERS)
get_tree().network_peer = peer
クライアントとして初期化して、特定のIPとポートに接続します:
var peer = NetworkedMultiplayerENet.new()
peer.create_client(SERVER_IP, SERVER_PORT)
get_tree().network_peer = peer
以前に設定したネットワーク ピアを取得します:
get_tree().get_network_peer()
ツリーがサーバーまたはクライアントとして初期化されているかどうかを確認します:
get_tree().is_network_server()
ネットワーク機能の終了:
get_tree().network_peer = null
(ゲームによっては、接続を閉じたりタイムアウトしたりするのではなく、他のピアに自分が離れることを知らせるために、最初にメッセージを送信することは理にかなっています。)
警告
When exporting to Android, make sure to enable the INTERNET
permission in the Android export preset before exporting the project or
using one-click deploy. Otherwise, network communication of any kind will be
blocked by Android.
接続の管理
いつでも接続を受け入れるゲームもあれば、ロビーの段階で接続するゲームもあります。 Godotは、どの時点でも接続を許可しないように要求できます(set_refuse_new_network_connections(bool) および SceneTree の関連メソッドを参照)。 接続するユーザーを管理するために、Godot はSceneTreeで次のシグナルを提供します:
サーバー及びクライアント:
network_peer_connected(int id)network_peer_disconnected(int id)
上記のシグナルは、新しいピアが接続または切断したときに、サーバーに接続されているすべてのピア(サーバー上を含む)で呼び出されます。 クライアントは1より大きい一意のIDで接続しますが、ネットワークピアID 1は常にサーバーです。 1未満は無効として処理されます。ローカルシステムのIDは、SceneTree.get_network_unique_id() から取得できます。これらのIDは、主にロビー管理に役立ち、接続されたピア、つまりプレイヤーを識別するため、通常は保存する必要があります。 IDを使用して、特定のピアにのみメッセージを送信することもできます。
クライアント:
connected_to_serverconnection_failedserver_disconnected
繰り返しますが、これらの機能はすべて、主にロビー管理やその場でのプレイヤーの追加/削除に役立ちます。 これらのタスクの場合、サーバーは明らかにサーバーとして機能する必要があり、既に接続されている他のプレイヤーに、新しく接続されたプレイヤーに関する情報(名前、統計など)を送信するなどのタスクを手動で実行する必要があります。
ロビーは任意の方法で実装できますが、最も一般的な方法は、すべてのピアのシーンで同じ名前のノードを使用することです。 一般的に、自動ロードされたノード/シングルトンはこれに最適で、常にアクセスできます。例 "/root/lobby"。
RPC
ピア間で通信するための最も簡単な方法は、RPC(リモートプロシージャコール)を使用することです。これは一連の関数として Node で実装されます:
rpc("function_name", <optional_args>)rpc_id(<peer_id>,"function_name", <optional_args>)rpc_unreliable("function_name", <optional_args>)rpc_unreliable_id(<peer_id>, "function_name", <optional_args>)
メンバー変数の同期も可能です:
rset("variable", value)rset_id(<peer_id>, "variable", value)rset_unreliable("variable", value)rset_unreliable_id(<peer_id>, "variable", value)
関数は、次の2つの方法で呼び出すことができます:
Reliable: when the function call arrives, an acknowledgement will be sent back; if the acknowledgement isn't received after a certain amount of time, the function call will be re-transmitted.
Unreliable: the function call is sent only once, without checking to see if it arrived or not, but also without any extra overhead.
ほとんどの場合、信頼性が求められます。 Unreliableは、オブジェクトの位置を同期するときに主に役立ちます(同期は絶えず発生する必要があり、パケットが失われた場合でも、その後に新しいパケットが到着し、その間にオブジェクトがさらに移動したために、失われたパケットの情報は古くなっている可能性があるため、無くなってもさほど問題はありません。ほぼ、これは再送と同じ結果です)。
There is also SceneTree.get_rpc_sender_id(), which can be used to check which peer (or peer ID) sent an RPC.
ロビーに戻る
ロビーに戻りましょう。サーバーに接続する各プレイヤーが、そのことを全員に伝えることを想像してみてください。
# Typical lobby implementation; imagine this being in /root/lobby.

extends Node

# Connect all functions

func _ready():
    get_tree().connect("network_peer_connected", self, "_player_connected")
    get_tree().connect("network_peer_disconnected", self, "_player_disconnected")
    get_tree().connect("connected_to_server", self, "_connected_ok")
    get_tree().connect("connection_failed", self, "_connected_fail")
    get_tree().connect("server_disconnected", self, "_server_disconnected")

# Player info, associate ID to data
var player_info = {}
# Info we send to other players
var my_info = { name = "Johnson Magenta", favorite_color = Color8(255, 0, 255) }

func _player_connected(id):
    # Called on both clients and server when a peer connects. Send my info to it.
    rpc_id(id, "register_player", my_info)

func _player_disconnected(id):
    player_info.erase(id) # Erase player from info.

func _connected_ok():
    pass # Only called on clients, not server. Will go unused; not useful here.

func _server_disconnected():
    pass # Server kicked us; show error and abort.

func _connected_fail():
    pass # Could not even connect to server; abort.

remote func register_player(info):
    # Get the id of the RPC sender.
    var id = get_tree().get_rpc_sender_id()
    # Store the info
    player_info[id] = info

    # Call function to update lobby UI here
あなたはすでに別のことに気付いているかもしれません。これは、 register_player 関数の remote キーワードの使用法です:
remote func register_player(info):
This keyword is one of many that allow a function to be called by a remote procedure call (RPC). There are six of them total:
remoteremotesyncpuppetpuppetsyncmastermastersync
Each of them designate who can call the rpc, and optionally sync if the RPC can be called locally.
注釈
If no rpc keywords are added, Godot will block any attempts to call functions remotely. This makes security work a lot easier (so a client can't call a function to delete a file on another client's system).
The remote keyword can be called by any peer, including the server and all clients.
The puppet keyword means a call can be made from the network master to any network puppet.
The master keyword means a call can be made from any network puppet to the network master.
If sync is included, the call can also be made locally. For example, to allow the network master to change the player's position on all peers:
puppetsync func update_position(new_position):
    position = new_position
ちなみに
You can also use SceneTree.get_rpc_sender_id() to have more advanced rules on how an rpc can be called.
These keywords are further explained in Synchronizing the game.
これにより、ロビー管理について多少説明する必要があります。ゲームを開始したら、セキュリティを追加して、クライアントがおかしなことをしないようにします(時々、またはゲーム開始前に送信する情報を検証します)。話を簡単にするため、また各ゲームは異なる情報を共有するため、ここでは具体例を示していません。
ゲームを開始する
十分な数のプレイヤーがロビーに集まったら、サーバーはおそらくゲームを開始するはずです。これ自体は特別なことではありませんが、この時点であなたの人生をもっと楽にするためにできるいくつかの素晴らしいトリックを説明します。
プレイヤーシーン
ほとんどのゲームでは、各プレイヤーが独自のシーンを持っているでしょう。これはマルチプレイヤーゲームであるため、すべてのピアで それに接続されているプレイヤーごとに1つのシーン をインスタンス化する必要があることに注意してください。 4プレイヤーゲームの場合、各ピアは4プレイヤーノードをインスタンス化する必要があります。
それでは、そのようなノードにどのように名前を付けるのでしょうか? Godotでは、ノードに一意の名前を付ける必要があります。また、プレイヤーがどのノードを各プレイヤーIDを表すかを比較的簡単に判断できる必要があります。
解決策は、インスタンス化されたプレイヤーシーンの ルートノードにnetwork ID という名前を付けるだけです。このように、それらはすべてのピアで同じになり、RPCはうまく機能します!次に例を示します:
remote func pre_configure_game():
    var selfPeerID = get_tree().get_network_unique_id()

    # Load world
    var world = load(which_level).instance()
    get_node("/root").add_child(world)

    # Load my player
    var my_player = preload("res://player.tscn").instance()
    my_player.set_name(str(selfPeerID))
    my_player.set_network_master(selfPeerID) # Will be explained later
    get_node("/root/world/players").add_child(my_player)

    # Load other players
    for p in player_info:
        var player = preload("res://player.tscn").instance()
        player.set_name(str(p))
        player.set_network_master(p) # Will be explained later
        get_node("/root/world/players").add_child(player)

    # Tell server (remember, server is always ID=1) that this peer is done pre-configuring.
    # The server can call get_tree().get_rpc_sender_id() to find out who said they were done.
    rpc_id(1, "done_preconfiguring")
注釈
pre_configure_game()を実行するタイミングによっては、シーンの作成中に SceneTree がロックされているため(例: _ready が呼び出されている場合)、call_deferred() を介して遅延されるように add_child() への呼び出しを変更する必要がある場合があります。
ゲームの開始を同期する
プレイヤーのセットアップには、遅延、ハードウェアの違い、またはその他の理由により、ピアごとに異なる時間がかかる場合があります。全員の準備が整ったときにゲームが実際に開始されるようにするには、すべてのプレイヤーの準備が整うまでゲームを一時停止すると便利です:
remote func pre_configure_game():
    get_tree().set_pause(true) # Pre-pause
    # The rest is the same as in the code in the previous section (look above)
サーバーは、すべてのピアからOKを取得すると、たとえば次のように開始するように指示できます:
var players_done = []
remote func done_preconfiguring():
    var who = get_tree().get_rpc_sender_id()
    # Here are some checks you can do, for example
    assert(get_tree().is_network_server())
    assert(who in player_info) # Exists
    assert(not who in players_done) # Was not added yet

    players_done.append(who)

    if players_done.size() == player_info.size():
        rpc("post_configure_game")

remote func post_configure_game():
    # Only the server is allowed to tell a client to unpause
    if 1 == get_tree().get_rpc_sender_id():
        get_tree().set_pause(false)
        # Game starts now!
ゲームの同期
ほとんどのゲームでは、マルチプレイヤーネットワーキングの目標は、ゲームをプレイするすべてのピアで同期して実行することです。 RPCとリモートメンバー変数セットの実装を提供することに加えて、Godotはネットワークマスターの概念を追加します。
ネットワークマスター
ノードのネットワークマスターは、そのノードに対する最終的な権限を持つピアです。
明示的に設定しない場合、ネットワーク マスタは親ノードから継承され、変更されていない場合は常にサーバー(ID 1)になります。したがって、サーバーにはデフォルトですべてのノードに対する権限があります。
ネットワークマスターは、次の関数で設定できます Node.set_network_master(id, recursive) (デフォルトでは再帰は true で、ネットワークマスターは同様にノードのすべての子ノードに再帰的に設定されます)。
Node.is_network_master() を呼び出すと、ピア上の特定のノードインスタンスが、接続されているすべてのピアのこのノードのネットワークマスターであることを確認できます。これは、サーバーで実行されると true を返し、すべてのクライアントピアで false を返します。
前の例に注意を払っていた場合、各ピアがサーバーではなく独自の プレイヤー(ノード)のネットワークマスター権限を持つように設定されていることに気付くかもしれません:
[...]
# Load my player
var my_player = preload("res://player.tscn").instance()
my_player.set_name(str(selfPeerID))
my_player.set_network_master(selfPeerID) # The player belongs to this peer; it has the authority.
get_node("/root/world/players").add_child(my_player)

# Load other players
for p in player_info:
    var player = preload("res://player.tscn").instance()
    player.set_name(str(p))
    player.set_network_master(p) # Each other connected peer has authority over their own player.
    get_node("/root/world/players").add_child(player)
[...]
このコードが各ピアで実行されるたびに、ピアはそれが制御するノード上でマスターになり、他のすべてのノードはサーバがネットワーク マスターである Puppet として残ります。
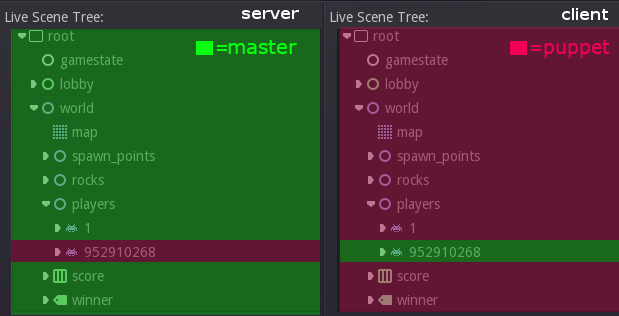
明確にするために、これが bomber demo でどのように見えるかの例を示します:
マスターとパペットのキーワード
このモデルの本当の利点は、GDScriptの master/puppet キーワード(またはC#とVisual Scriptの同等のキーワード)で使用する場合です。remote キーワードと同様に、関数にもそれらのタグを付けることができます:
爆弾のコード例:
for p in bodies_in_area:
    if p.has_method("exploded"):
        p.rpc("exploded", bomb_owner)
プレイヤーのコード例:
puppet func stun():
    stunned = true

master func exploded(by_who):
    if stunned:
        return # Already stunned

    rpc("stun")

    # Stun this player instance for myself as well; could instead have used
    # the remotesync keyword above (in place of puppet) to achieve this.
    stun()
In the above example, a bomb explodes somewhere (likely managed by whoever is the master of this bomb-node, e.g. the host).
The bomb knows the bodies (player nodes) in the area, so it checks that they contain an exploded method before calling it.
Recall that each peer has a complete set of instances of player nodes, one instance for each peer (including itself and the host). Each peer has set itself as the master of the instance corresponding to itself, and it has set a different peer as the master for each of the other instances.
Now, going back to the call to the exploded method, the bomb on the host has called it remotely on all bodies in the area
that have the method. However, this method is in a player node and has a master keyword.
The master keyword on the exploded method in the player node means two things for how this call is made.
Firstly, from the perspective of the calling peer (the host), the calling peer will only attempt to remotely call the
method on the peer that it has set as the network master of the player node in question.
Secondly, from the perspective of the peer the host is sending the call to, the peer will only accept the call if it
set itself as the network master of the player node with the method being called (which has the master keyword).
This works well as long as all peers agree on who is the master of what.
The above setup means that only the peer who owns the affected body will be responsible for telling all the other peers that its body
was stunned, after being remotely instructed to do so by the host's bomb.
The owning peer therefore (still in the exploded method) tells all the other peers that its player node was stunned.
The peer does this by remotely calling the stun method on all instances of that player node (on the other peers).
Because the stun method has the puppet keyword, only peers who did not set themselves as the network master of the node will
call it (in other words, those peers are set as puppets for that node by virtue of not being the network master of it).
The result of this call to stun is to make the player look stunned on the screen of all the peers, including the current
network master peer (due to the local call to stun after rpc("stun")).
The master of the bomb (the host) repeats the above steps for each of the bodies in the area, such that all the instances of any player in the bomb area get stunned on the screens of all the peers.
Note that you could also send the stun() message only to a specific player by using rpc_id(<id>, "exploded", bomb_owner).
This may not make much sense for an area-of-effect case like the bomb, but might in other cases, like single target damage.
rpc_id(TARGET_PEER_ID, "stun") # Only stun the target peer
Exporting for dedicated servers
Once you've made a multiplayer game, you may want to export it to run it on a dedicated server with no GPU available. See Exporting for dedicated servers for more information.
注釈
The code samples on this page aren't designed to run on a dedicated server. You'll have to modify them so the server isn't considered to be a player. You'll also have to modify the game starting mechanism so that the first player who joins can start the game.
注釈
The bomberman example here is largely for illustrational purposes, and does not
do anything on the host-side to handle the case where a peer uses a custom client
to cheat by for example refusing to stun itself. In the current implementation
such cheating is perfectly possible because each client is the network master of
its own player, and the network master of a player is the one which decides whether
to call the I-was-stunned method (stun) on all of the other peers and itself.