WebRTC
HTML5、WebSocket、WebRTC
Godotの優れた機能の1つは、HTML5/WebAssemblyプラットフォームにエクスポートできることです。これにより、ユーザーがWebページにアクセスしたときに、ブラウザでゲームを直接実行できます。
これはデモと完全なゲームの両方にとって素晴らしい機会ですが、以前はいくつかの制限がありました。ネットワークの分野では、ブラウザは最近まで、最初にWebSocket、次にWebRTCが標準として提案されるまではHTTPRequestsのみをサポートしていました。
WebSocket
2011年12月にWebSocketプロトコルが標準化されたとき、ブラウザはWebSocketサーバーへの安定した双方向の接続を作成できました。プロトコルは非常にシンプルですが、ブラウザにプッシュ通知を送信するための非常に強力なツールであり、チャット、ターンベースのゲームなどの実装に使用されています。
ただし、WebSocketは依然としてTCP接続を使用します。TCP接続は信頼性には優れていますが、低遅延には適していません。したがって、VoIPやテンポの速いゲームなどのリアルタイムアプリケーションには適していません。
WebRTC
このため、2010年以降、GoogleはWebRTCと呼ばれる新しいテクノロジーの開発に着手しました。WebRTCは、2017年にW3Cの推奨候補になりました。 WebRTCは、はるかに複雑な仕様のセットであり、2つのピア間で高速でリアルタイムの安全な通信を提供するために、舞台裏にある他の多くのテクノロジー(ICE、DTLS、SDP)に依存しています。
このアイデアは、2つのピア間の最速のルートを見つけて、可能な限り直接通信を確立することです(つまり、中継サーバーを回避しようとします)。
ただし、これには代償が伴います。つまり、通信を開始する前に、2つのピア間で一部のメディア情報を交換する必要があります(セッション記述プロトコル - SDP文字列の形式)。これは通常、いわゆるWebRTC Signaling Serverの形式を取ります。
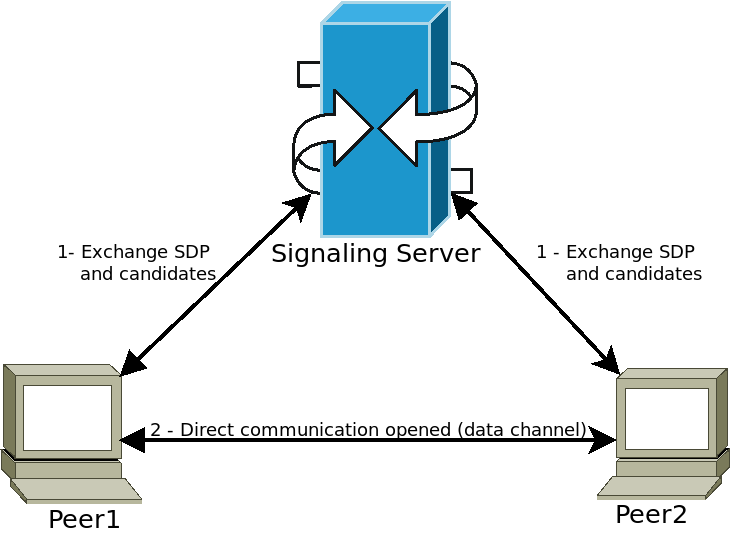
ピアはシグナリングサーバー(WebSocketサーバーなど)に接続し、メディア情報を送信します。サーバーはこの情報を他のピアに中継し、ピアが目的の直接通信を確立できるようにします。このステップが完了すると、ピアはシグナリングサーバーから切断し、直接ピアツーピア(P2P)接続を開いたままにすることができます。
GodotでWebRTCを使用する
WebRTCは、2つのメインクラス WebRTCPeerConnection および WebRTCDataChannel に加えて、マルチプレイヤーAPI実装 WebRTCMultiplayer を介してGodotに実装されます。詳細については、high-level multiplayer のセクションを参照してください。
注釈
これらのクラスはHTML5で自動的に使用できますが、ネイティブ(非HTML5) プラットフォームでは外部GDNativeプラグインが必要です。手順については、webrtc-native plugin repository を確認し、最新の release を取得してください。
警告
When exporting to Android, make sure to enable the INTERNET
permission in the Android export preset before exporting the project or
using one-click deploy. Otherwise, network communication of any kind will be
blocked by Android.
最小限の接続例
この例では、同じアプリケーション内の2つのピア間にWebRTC接続を作成する方法を示します。これは実際にはあまり有用ではありませんが、WebRTC接続がどのように設定されるかについての概要を説明します。
extends Node

# Create the two peers
var p1 = WebRTCPeerConnection.new()
var p2 = WebRTCPeerConnection.new()
# And a negotiated channel for each each peer
var ch1 = p1.create_data_channel("chat", {"id": 1, "negotiated": true})
var ch2 = p2.create_data_channel("chat", {"id": 1, "negotiated": true})

func _ready():
    # Connect P1 session created to itself to set local description
    p1.connect("session_description_created", p1, "set_local_description")
    # Connect P1 session and ICE created to p2 set remote description and candidates
    p1.connect("session_description_created", p2, "set_remote_description")
    p1.connect("ice_candidate_created", p2, "add_ice_candidate")

    # Same for P2
    p2.connect("session_description_created", p2, "set_local_description")
    p2.connect("session_description_created", p1, "set_remote_description")
    p2.connect("ice_candidate_created", p1, "add_ice_candidate")

    # Let P1 create the offer
    p1.create_offer()

    # Wait a second and send message from P1
    yield(get_tree().create_timer(1), "timeout")
    ch1.put_packet("Hi from P1".to_utf8())

    # Wait a second and send message from P2
    yield(get_tree().create_timer(1), "timeout")
    ch2.put_packet("Hi from P2".to_utf8())

func _process(_delta):
    # Poll connections
    p1.poll()
    p2.poll()

    # Check for messages
    if ch1.get_ready_state() == ch1.STATE_OPEN and ch1.get_available_packet_count() > 0:
        print("P1 received: ", ch1.get_packet().get_string_from_utf8())
    if ch2.get_ready_state() == ch2.STATE_OPEN and ch2.get_available_packet_count() > 0:
        print("P2 received: ", ch2.get_packet().get_string_from_utf8())
これは次のように出力されます:
P1 received: Hi from P1
P2 received: Hi from P2
ローカルシグナリングの例
この例は前の例を拡張し、2つの異なるシーンでピアを分離し、シグナリングサーバーとして singleton を使用します。
# An example P2P chat client (chat.gd)
extends Node

var peer = WebRTCPeerConnection.new()

# Create negotiated data channel
var channel = peer.create_data_channel("chat", {"negotiated": true, "id": 1})

func _ready():
    # Connect all functions
    peer.connect("ice_candidate_created", self, "_on_ice_candidate")
    peer.connect("session_description_created", self, "_on_session")

    # Register to the local signaling server (see below for the implementation)
    Signaling.register(get_path())

func _on_ice_candidate(mid, index, sdp):
    # Send the ICE candidate to the other peer via signaling server
    Signaling.send_candidate(get_path(), mid, index, sdp)

func _on_session(type, sdp):
    # Send the session to other peer via signaling server
    Signaling.send_session(get_path(), type, sdp)
    # Set generated description as local
    peer.set_local_description(type, sdp)

func _process(delta):
    # Always poll the connection frequently
    peer.poll()
    if channel.get_ready_state() == WebRTCDataChannel.STATE_OPEN:
        while channel.get_available_packet_count() > 0:
            print(get_path(), " received: ", channel.get_packet().get_string_from_utf8())

func send_message(message):
    channel.put_packet(message.to_utf8())
そして、ローカルシグナリングサーバーの場合:
注釈
このローカルシグナリングサーバーは、同じシーン内の2つのピアを接続するための singleton として使用されることになっています。
# A local signaling server. Add this to autoloads with name "Signaling" (/root/Signaling)
extends Node

# We will store the two peers here
var peers = []

func register(path):
    assert(peers.size() < 2)
    peers.append(path)
    # If it's the second one, create an offer
    if peers.size() == 2:
        get_node(peers[0]).peer.create_offer()

func _find_other(path):
    # Find the other registered peer.
    for p in peers:
        if p != path:
            return p
    return ""

func send_session(path, type, sdp):
    var other = _find_other(path)
    assert(other != "")
    get_node(other).peer.set_remote_description(type, sdp)

func send_candidate(path, mid, index, sdp):
    var other = _find_other(path)
    assert(other != "")
    get_node(other).peer.add_ice_candidate(mid, index, sdp)
その後、次のように使用できます:
# Main scene (main.gd)
extends Node

const Chat = preload("res://chat.gd")

func _ready():
    var p1 = Chat.new()
    var p2 = Chat.new()
    add_child(p1)
    add_child(p2)
    yield(get_tree().create_timer(1), "timeout")
    p1.send_message("Hi from %s" % p1.get_path())

    # Wait a second and send message from P2
    yield(get_tree().create_timer(1), "timeout")
    p2.send_message("Hi from %s" % p2.get_path())
これはこれに類似した何かを出力します:
/root/main/@@3 received: Hi from /root/main/@@2
/root/main/@@2 received: Hi from /root/main/@@3
WebSocketを使用したリモートシグナリング
ピアのシグナリングにWebSocketを使用し、WebRTCMultiplayer を使用したより高度なデモは、 networking/webrtc_signaling 内の godot demo projects にあります。